
Living in a camper with kids means stepping on plastic dinosaurs before your morning coffee finishes brewing. Standard houses have closets, basements, and spare bedrooms to swallow the clutter. In a travel trailer or motorhome, three stray toys on the floor can block the entire hallway.
Most conventional parenting advice tells you to buy big matching plastic bins. Put those inside a camper, and you quickly realize they slide across the floor on highway curves, jam the slide-outs, and steal precious foot room. You end up shuffling boxes from the couch to the bed just so someone can sit down.
The secret is setting up systems that fit thin RV walls, withstand bumpy transit days, and stay low enough for small hands to clean up alone. These field-tested rv toy storage ideas let your kids keep their favorite activities while keeping your living space calm, functional, and organized.
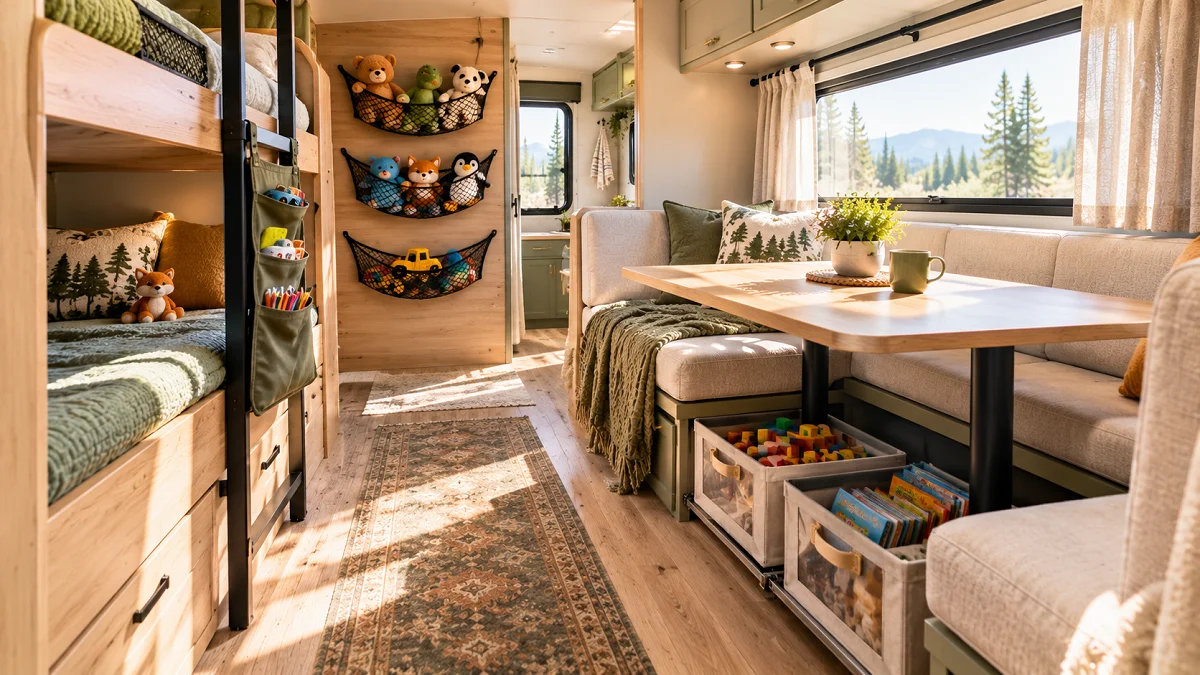
1. Mount Soft Mesh Cargo Nets Along the Bunk Wall
Hard plastic bins bounce off small bunk ledges the moment you hit highway speeds. Flexible elastic cargo nets hug the wall tightly, holding stuffed animals, bedtime books, and soft toys flat against the vertical paneling. Kids can tuck their favorite things away right before bed without climbing down the ladder.
RV walls are thin, often made of lightweight luan paneling with minimal wood studs behind them. Regular wood screws can punch straight through to the exterior wall or rip out under load. Short hollow-wall anchors or adhesive-backed mounting clips distribute weight evenly across the panel.
💡 Pro Tip: Wall Mounting Without Tears
Use 1/2-inch short pan-head screws with nylon wall anchors, or heavy-duty outdoor mounting tape rated for temperature swings. Test your net tension with plush toys first before letting kids load heavy wooden blocks into it.
- Anchor each corner at least four inches away from window frames to avoid inner structural seals.
- Keep the net height level with your child’s chest when they sit upright in bed.
- Restrict items in wall nets to lightweight gear like plushies, felt books, and bedtime flashlights.
2. Tuck Clear Zipper Pouches Inside a Bedside Pocket Organiser
Cardboard toy boxes deteriorate quickly from camper humidity and rough handling. Thick PVC zipper bags save space by squishing puzzle pieces, mini figurines, and art supplies down to the thickness of a small magazine.
Once flat, these pouches slip easily into fabric bedside hanging caddies. Hanging the organizer off the mattress rail turns unused bunk edges into an organized grab-and-go station for morning quiet time.
- Buy pouches made of reinforced, waterproof mesh-grid vinyl with smooth nylon zippers.
- Label the zipper pull tabs with colored ribbon tags so kids know what is inside without opening them.
- Limit each child to three filled pouches at a time to prevent overload on bedside stitching.
3. Slide Low-Profile Rolling Bins Under the Dinette Benches
The cavity under your dinette table often turns into a messy graveyard of shoes and dropped toys. Shallow storage bins fitted with smooth caster wheels roll cleanly in and out of this underused pocket.
Because dinettes sit on raised platforms in many slide-out campers, measure the lip clearance carefully before buying containers. A bin that is just a half-inch too tall will snag on the carpet trim or table legs every time you pull it out.
Dinette Bin Fit Checklist
- Clear out existing loose items and vacuum dirt tracked in by campground shoes.
- Measure vertical height from the floor to the lowest under-bench framing crossbar.
- Apply adhesive non-skid foam pads underneath the bin edges to stop travel-day movement.
4. Hang a Tiered Wire Fruit Basket in the Kitchen-to-Living Corner
Corner air space in campers often goes completely unused. A three-tier hanging wire basket mounts to an overhead ceiling hook, lifting awkward, medium-sized toys completely off your precious counter and floor space.
This arrangement works best for awkward shapes that jam up standard square drawers. Bath toys, action figure squads, and toy food sets dry out quickly in the open wire mesh rather than growing mold in enclosed bins.
Bath toys and squeaky animals gather puddles on the kitchen dinette edge, eating away prep space.
Items hang vertically in breathable tiers, draining clean water into a towel while opening up your countertops.
- Always unhook the hanging basket and lay it flat inside the kitchen sink on travel days to prevent swinging.
- Put heavier toys in the bottom basket and featherweight toys at the very top.
- Choose wire baskets with smooth powder-coated finishes to prevent rust from damp campsite gear.
5. Convert an Over-the-Door Shoe Caddy for Action Figures and Art Packs
The bathroom door or bunkroom wardrobe door hides lots of flat storage real estate. Fabric shoe caddies give you two dozen separate slots without stealing an inch of walk space.
Kids can see directly into the pockets, helping them find their toys without dumping everything on the floor. Dedicate bottom rows to everyday toys and top rows to supervised supplies like paint brushes, scissors, and small beads.
| Feature | Clear Vinyl Caddy | Breathable Fabric Mesh |
|---|---|---|
| Visibility | Complete crystal-clear view | Slightly obscured silhouette |
| Durability | Can crack in freezing winter storage | Tolerates extreme temperature shifts |
| Cleaning | Wipes clean instantly with spray | Must be machine or hand-washed |
- Trim the lower tiers if your camper door has custom height limits so it doesn’t drag on floor trim.
- Secure bottom grommets with adhesive hooks to prevent the organizer from flapping when doors swing open.
- Assign each child a dedicated row with a name tag or colored patch.
6. Label Collapsible Canvas Cubes for Each Kid’s Daily Toys
Collapsible fabric bins remain a road-life staple because they pack down flat when empty. Giving each child one single bin teaches limits and establishes a simple clean-up routine that takes under five minutes.
When toys overflow the designated cube, it is time for a family pass-down or toy swap. Keeping the bin soft also means zero scuff marks when kids drag their box across your dining area cushions.
Fold flat and stow behind furniture cushions when toys are out at play.
Enforce a strict “one cube per child” policy to limit toy creep inside small quarters.
Leaving unbraced cubes stacked tall on top bunks on bumpy driving days.
Using oversized cubes that are too heavy for toddlers to lift without spilling.
- Pick bins with sturdy, riveted fabric handles on both sides for easy hauling.
- Store cubes inside bunk cubbies or tucked along the sofa base during travel.
- Label boxes with visual photo icons for young toddlers who cannot read yet.
7. Anchor Heavy Plastic Totes in the Exterior Basement Pass-Through
Bulky outdoor items like remote control trucks, sand shovels, and sports balls take up too much interior room. Moving those larger toys down into the exterior storage compartment keeps dried mud, grass clippings, and sand outside where they belong.
Smooth plastic totes slide along camper compartment floors when braking. Securing them with adjustable tension tracks or simple floor-mounted straps stops heavy gear from smashing into water valves or electrical wiring.
Group outdoor toys into heavy-duty plastic storage totes with snap-locking handles.
Fasten an adjustable cargo bar across the pass-through floor directly in front of the totes.
Clip a carabiner cord over the lid handles to hold everything down on rough backroads.
- Always position heavy toy totes near the camper axle centerline to maintain safe tongue weight.
- Choose water-resistant totes with gasketed rims to keep out highway spray and dust.
- Keep one smaller grab-bin right next to the compartment door for park visits during rest stops.
8. Swap Bulky Board Game Boxes into Slim Zipper Envelopes
Commercial board game boxes are mostly empty air, cardboard packaging, and plastic inserts. Taking a stack of twenty boxed games on an RV trip can fill an entire cabinet.
Ditching original cardboard packaging and slipping boards, cards, and instructions into A4 mesh document pouches reduces game storage volume by nearly eighty percent. Store all game envelopes upright inside a single magazine rack or slim basket for easy pickings on rainy days.
- Cut the graphic title panel from the original game box to slip into the clear front pouch.
- Place dice, pawns, and sand timers in small snack bags before placing them in the larger game envelope.
- Pick envelopes with cross-woven thread reinforcing to keep cardboard board edges from tearing the seams.
9. Fasten Peel-and-Stick Silicone Wall Pockets by the Lower Bunk Headboard
Bedside table space does not exist in most RV bunk layouts. Small silicone pockets mount cleanly beside headboards, offering a flexible catchall for bedtime companions, handheld gaming devices, and reading glasses.
Because these pockets are soft and rubbery, kids will not bruise their heads or arms if they bump into them while sleeping. The adhesive grips well on smooth wall coverings without rattling against walls while driving.
⚠️ Watch Out: Summer Heat Risks
RV interiors reach high temperatures when left in summer storage. Standard adhesive pads melt and slide, leaving sticky residue behind. Use heavy-duty, high-heat automotive acrylic tape to keep wall pockets firmly in place.
- Clean the wall area thoroughly with rubbing alcohol and let dry completely before sticking.
- Keep pockets low enough that young kids can reach them without balancing on bunk edges.
- Check pocket capacity to make sure drinks or heavy electronic gear aren’t dropped inside.
10. Suspend a Macrame Toy Hammock Across the Cabover Ceiling Corner
Class C motorhomes and bunkhouse trailers have high corners that stay empty. Triangular netting strung securely across these ceiling angles holds large stuffed animals and lightweight bulky toys above everyday walking spaces.
Placing lightweight toys up high gives kids a cozy display they can admire from bed. It also keeps large stuffed animals from gathering pet hair and dirt on low carpets.
Only load featherweight plush items into high hammocks. Heavy plastic toys or wooden blocks can turn into dangerous airborne missiles during sudden emergency stops on the road.
- Use screw-in ceiling hooks anchored directly into solid corner framing or metal trim beams.
- Loop one heavy safety carabiner through the three corner rings to prevent accidental unhooking.
- Pick stretchy macrame cord with tight knot intervals so small plush ears do not dangle through.
11. Use Tension Rods Inside Open Bookshelves to Stop Transit Spills
Open cubbies and shelves make great book displays while parked. However, the first sharp turn you take on moving day will throw heavy hardcover books across the floor.
Spring-loaded shower curtain tension rods placed across the open face of lower shelves keep reading materials pinned securely in place. Kids simply tilt the book back slightly to pull it up and over the barrier bar.
Tension Bar Setup Checklist
- Double up rods vertically if you are holding taller coloring pads and wide spiral sketchbooks.
- Adjust rod tension until it holds firm against a firm outward push with your palm.
- Choose dark bronze or white finishes that blend directly with your RV’s cabinetry finish.
12. Stash Outdoor Toys in a Weatherproof Bungee-Strapped Milk Crate
Camping toys end up covered in grass clippings, mud, and lake water. Bringing that dirty gear inside the living area ruins clean carpets and leaves your camper smelling like a wet pond.
Heavy-duty commercial milk crates strapped to rear ladder steps or bumper hitch trays keep messy outdoor gear ventilated and out of the living space. Rain washes dirt straight out through the crate holes, and air currents dry water toys while you travel to the next site.
- Look for genuine high-density polyethylene milk crates, not cheap decorative display boxes.
- Thread heavy UV-resistant ratchet straps or locking bungees through the crate handles to secure it to your bumper.
- Drill a couple of drainage holes along the bottom rim corners if yours does not have open mesh bases.
13. Clip Drawing Paper and Colouring Books to Magnetic Cabinet Bars
Coloring pads, drawing paper, and sticker sheets end up wrinkled when crammed into overflowing toy drawers. Wall-mounted magnetic bars keep art supplies flat and within easy reach along blank kitchen island sides or bedroom walls.
Using small magnetic metal binder clips allows kids to hang their current projects without parent help. It doubles as a rotating gallery wall to show off your children’s latest camping masterpieces.
| Method | Magnetic Strip Bars | Adhesive Plastic Clips |
|---|---|---|
| Capacity | Holds 8-12 stacked art pads | Holds 1-2 pads before snapping |
| Wall Impact | Anchored cleanly at 2 points | Sticks across large wallpaper patches |
| Flexibility | Clips slide and rearrange freely | Fixed location; cannot shift width |
- Mount the magnetic bar at your child’s waist height so they can clip their own drawings up independently.
- Add a small magnetic tin container to hold pencils, colored markers, and safety scissors nearby.
- Check that metal clips have plastic or rubber coatings on the grip teeth to keep paper from tearing.
14. Designate a Pop-Up Fabric Hamper for Bulky Outdoor Sports Balls
Soccer balls, playground kickballs, and inflatable pool floats roll around camper floors on travel days. A simple collapsible wire spring hamper keeps them corralled in one place.
Because the hamper walls are flexible, it can be squeezed into oddly shaped nooks next to the dinette base or under a bunk bed ladder. When camping season ends or the balls are packed outside, the whole hamper twists down into a flat disc the size of a dinner plate.
Soccer balls bounce down the hallway aisle every time you hit the brakes or turn a corner.
Sports gear sits corralled in an out-of-the-way corner, ready to grab whenever you head out to the park.
- Pick hampers with open breathable mesh sides so damp playground balls do not develop mildew.
- Sew a simple elastic loop or tie cord to keep the top rim closed during highway drives.
- Pick bright neon fabrics so the hamper is easy to spot in dim bunkroom corners.
15. Slide Flat Lego Building Baseplates Behind the Sofa Cushions
Lego bricks are fun for campsite downtime, but large building baseplates are difficult to store. If you stack them flat on bottom shelves, they get buried under heavier toys and crack under the weight.
The flat gap behind your RV jackknife sofa or slide-out couch cushions makes a great hideaway for wide construction baseplates. They slide in vertically, stay protected from heavy toys, and don’t take up any cupboard shelf space.
📌 Good To Know: Prevent Baseplate Warping
Plastic building baseplates can warp if pressed up against an exterior RV wall that gets direct sunlight. Always place a scrap piece of rigid cardboard behind the plates to shield them from heat and keep them flat.
- Store active Lego building plates inside an oversized zippered artist portfolio binder.
- Keep loose bricks in a soft drawstring bag that opens out into a flat play mat on the camper rug.
- Remind kids to clear all creations off the plates before stowing them away behind seat cushions for travel.
16. Mount Acrylic Spice Racks on the Wall for Mini Figure Displays
Clear acrylic spice ledges are a simple storage solution for camper parents. Their narrow profile stands off the wall just three inches, staying clear of walking paths and slide-out clearance lines.
They keep small figurines, collectable cars, and animal toys lined up and ready for play. The clear front lip keeps toys from toppling over while letting kids show off their favorite collections.
- Mount ledges using heavy-duty adhesive strips instead of screws to preserve thin camper walls.
- Choose shelving models with at least a 1.5-inch raised front retention bar to stop toys sliding out during transit.
- Space multiple shelves vertically with at least six inches of clearance for taller figures.
17. Strap a Hanging Closet Shelf Organiser Around the Bunk Ladder
Camper wardrobe closets are small, but hanging fabric shelving units can also be used outside the closet. Hanging one of these fabric units from the top rung of your bunk bed ladder turns an empty corner into practical, cubby-style storage.
This keeps games, clothes, and toy boxes arranged in practical vertical sections. If you need the ladder for bedtime climbing, simply slide the fabric unit along the rail or detach it using the hook-and-loop straps.
Wrap the heavy-duty velcro attachment tabs securely over the bunk safety rail or top ladder frame.
Thread a bungee strap around the bottom cubby and through the ladder rungs to prevent swinging.
Slide small fabric drawer inserts into the bottom compartments to keep loose building blocks secure.
- Pick narrow 6-inch or 8-inch wide models so you don’t block the walkway through the bunkroom door.
- Reinforce the bottom shelf of each tier by slipping in a trimmed piece of thin corrugated plastic.
- Use top cubbies for extra bedding, keeping toy storage focused on the lower, reachable shelves.
18. Pack Small Craft Supplies into Portable Tackle Boxes with Latches
Few things are more frustrating than vacuuming up beads, tiny plastic bricks, and crayons from deep camper rugs. Tackle utility boxes have individual latching compartments that keep small craft parts separated and secure, even on bumpy dirt roads.
Clear plastic lids let kids easily check which supplies they want before cracking the box open. The secure locking latches keep parts from spilling open when dropped or bumped.
Choose boxes with adjustable interior dividers to fit paint tubes, markers, and glue sticks.
Use boxes with dual independent snap locks so the lid stays closed during drops.
Buying single-latch boxes that pop open unexpectedly when dropped by little hands.
Mixing sticky craft dough in the same compartment with loose wooden or plastic pieces.
- Select boxes with built-in folding top handles so kids can carry their art kits out to campsite picnic tables.
- Line individual compartments with adhesive felt to keep loose craft beads from rattling on the road.
- Keep one tackle tray dedicated to jewelry string, scissors, and small threading craft parts.
19. Secure an Under-Bed Hydraulic Lift Bin with Removable Dividers
Many main RV beds and lower bunk platforms lift up on gas struts to reveal large hidden storage bays. While this space is often packed with extra blankets and spare parts, adding drop-in dividers turns it into an organized toy storage area.
Dividing the space lets you keep active toys near the front lift point and tuck bulkier gear into the back corners. It keeps off-season items out of sight while ensuring regular toys stay accessible with a quick lift of the bed.
Under-Bed Storage Strategy
- Check that your mattress gas struts have enough lift rating to raise comfortably with toys in place.
- Place soft foam edge strips on divider tops to prevent wooden edges from chafing mattress fabrics.
- Use clear storage containers without lids so you can grab items without holding the heavy bed platform up.
20. Run Heavy-Duty Carabiner Clips Along the Slide-Out Trim
The top wood or metal molding around an RV slide-out provides plenty of sturdy mounting points for hanging lightweight toys. Attaching locking carabiners or clip rings lets you hang sports equipment bags, toy totes, and headphones off the floor.
Using hanging storage in this space frees up high shelves for heavier gear. Hang your items using wide webbing straps to keep weight balanced and avoid damaging the wood framing.
Always unclip all bags before bringing slide-outs in on travel days. Hanging items caught between slide frames and the interior wall can crush toys and crack slide-out seals.
- Use heavy-duty screw eyelets fastened straight into solid wood header beams, avoiding thin fake panel trim.
- Limit total hanging weight to under ten pounds across each clip to avoid straining the camper’s trim molding.
- Choose soft nylon carabiner straps instead of metal chains to avoid annoying rattling sounds while driving.
21. Keep a Soft Travel Bag Packed for Playground and Campsite Excursions
Kids rarely play with all their toys inside the RV at the same time. Having a pre-packed, grab-and-go canvas duffel bag saves time when heading out to the park, lakefront, or bathhouse lounge.
Keep it stocked with a small set of outdoor favorites: a catch ball set, bubbles, a few toy trucks, and sidewalk chalk. When play time wraps up, all the gear goes straight back into the bag before you return indoors, leaving dirt outside the camper door.
💡 Pro Tip: Quick-Drying Canvas
Pick an unlined canvas or vinyl-mesh daypack with a rubberized mesh bottom. Sand and damp dirt sift straight through the mesh while walking, so your toys arrive back at the camper clean and dry.
- Hang the travel bag on a heavy coat hook right inside the primary camper entrance door.
- Keep a zippered pouch inside for spare wet wipes to clean muddy toy wheels before bringing them back inside.
- Choose bright neon fabric colors that are easy to spot across a busy campground playground.
22. Dedicate a Low Ottoman with Built-in Hidden Interior Storage
Furniture that serves only one purpose takes up valuable space in small RV interiors. Replacing bulky, hard-edged coffee tables with a soft storage ottoman provides extra seating, a footrest, and a spacious hidden toy chest all in one.
Kids can sit comfortably on the cushioned top to build puzzles, play games, or read books. When it is time to clean up, the lid lifts off so all their daily toys can be put away out of sight.
- Choose wipeable faux-leather or vinyl upholstery that cleans up easily from spills and dirt.
- Pick an ottoman with a safety-hinged lid that stays open to protect small fingers from getting pinched.
- Slide the ottoman up against the sofa base on travel days to keep it from shifting on the highway.
23. Run a Weekly One-In, One-Out Toy Rotation Box in the Tow Vehicle
Kids naturally get bored of toys when they play with the same items every day in a camper. Keeping a locked rotation tote in your tow vehicle or camper basement allows you to swap out half their toys every couple of weeks.
Swapping out toys regularly makes old items feel brand new again without buying anything new. It cuts down your indoor toy collection by half while keeping your children engaged throughout long trips.
Pack half your child’s current toys into a labeled plastic tote stowed in your tow vehicle trunk.
Every other Sunday, swap three indoor toys for three fresh items stored in the rotation box.
Donate any toys that your kids skip or ignore during two full rotation cycles.
- Keep the rotation box hidden away so kids don’t rummage through it outside scheduled swap times.
- Let your children choose which toys go into the rotation so they feel in control of the process.
- Keep favorite comfort toys, bedtime plushies, and core reading books out of the rotation schedule permanently.
Setting up practical rv toy storage ideas isn’t about getting rid of the things your kids love. It is about choosing systems that fit small camper layouts and can handle the bumps of road travel. When everything has a dedicated spot that small hands can easily reach, tidying up takes just a few minutes, giving your family more time to relax around the campfire.
Save this list to your RV organization board on Pinterest so you can reference these setup ideas before your next camping trip.

