
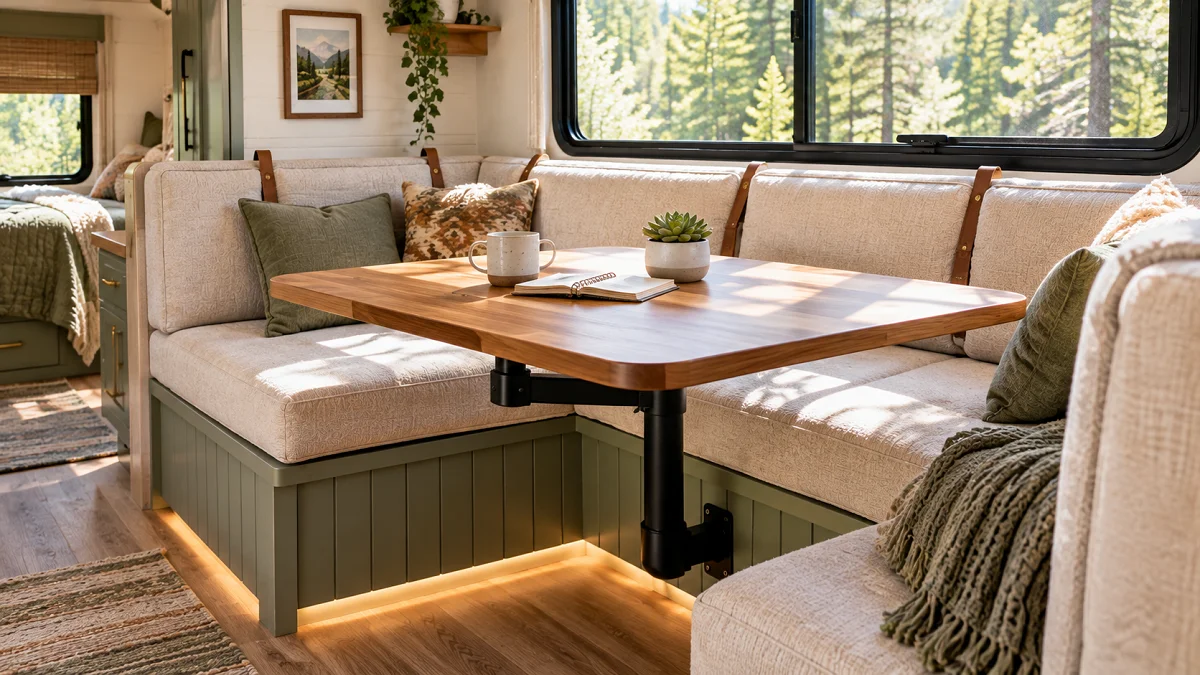
Most factory RV dinette booths are built for mass assembly rather than genuine comfort. The slick faux leather cracks around season three, the table pedestals rob you of knee space, and getting into the under-bench storage feels like an Olympic wrestling match with heavy foam cushions.
Standard renovation advice usually tells you to tear everything out and drop in residential chairs. That often backfires. Residential furniture rarely stays anchored on rough highway curves, cuts into your hidden gear storage, and leaves odd floor voids that are difficult to insulate.
Upgrading this small footprint does not require structural demolition. With smart materials, lighter surfaces, and thoughtful mounting gear, you can build a booth that handles breakfast scrambles, works smoothly as a mobile desk, and converts back to a bed without hassle. Here are practical rv dinette booth makeover ideas that keep your storage intact while solving everyday comfort flaws.
1. Swap Tired Vinyl for Wipeable Marine Grade Faux Leather
Factory RV seating typically relies on thin, bonded polyurethane that flakes the moment temperature swings hit. Marine-grade vinyl or performance faux leather holds up against moisture, paws, and spilled morning coffee while letting you keep the existing cushion cores.
Look for 4-way stretch marine upholstery vinyl with an abrasion rating of at least 100,000 double rubs. It conforms cleanly around cushion curves without puckering at the corners. You can wrap and staple the fabric directly to the factory plywood baseboards underneath, eliminating the need for commercial sewing machines.
Peels and flakes under sun exposure.
Sticks to bare skin on humid travel days.
Requires complete cushion replacements.
Wipes clean using mild dish soap and water.
Resists UV degradation and highway cracking.
Wraps over wood backers with manual staples.
If you do not want to stitch new zipper tracks, use heavy-duty stainless upholstery staples along the cushion bottoms. Seal the unfinished raw fabric edge with a strip of waterproof sail-repair tape so the foam inside stays completely dry during humid seasons.
2. Build a Custom Wood Slat Tabletop Using Lightweight Cedar
Heavy fiberboard dinette tables with fake laminate banding add dead weight to your slide-out and wobble constantly. Swapping that heavy top for joined cedar or edge-glued pine drops the table mass by roughly half while adding real warmth to the interior.
Cedar boards are naturally light, dimensionally stable through humidity shifts, and simple to cut with basic hand tools. Plane the boards flat, dowel the edges together, and seal them with three coats of water-based polyurethane to stop grease and sauce stains.
💡 Weight And Finish Strategy
Western Red Cedar weighs roughly 23 pounds per cubic foot compared to 45 pounds for particleboard. Use satin water-based poly instead of oil finish to stop the pale wood from ambering yellow under direct RV slide-out windows.
Ensure your new tabletop dimensions do not exceed the distance between the two booth wall-cleats. When lower sleeping positions are required, the custom wood top must sit flush on those inner support rails to bridge the bed platform safely.
3. Install an Adjustable Lagun Table Leg for Zero Floor Obstruction
The dual floor pedestals found in most camper booths trap your feet, catch dirt, and lock the table into a rigid spot. Upgrading to an articulating Lagun mount attaches the table entirely to the bench face, clearing out every square inch of floor beneath your knees.
This setup swivels 360 degrees, allowing you to angle the tabletop sideways to ease the slide into the back seat. When mealtime ends, swing the entire surface away to turn one booth side into a clean workstation.
The outer framing of factory benches is often thin paneling. Never bolt an articulating arm directly to this thin wall without reinforcement. Run a solid 3/4-inch plywood backer block inside the bench cavity behind the bracket mounting bolts to distribute leverage across the entire frame.
4. Add Drop-Front Cabinet Doors to Stop Cushion-Lifting Storage Access
Accessing under-seat storage in a camper typically requires moving table settings, sliding out, and lifting clumsy plywood lids. Adding front-access magnetic drop doors lets you grab cooking gear or games directly from the aisle without shifting a single cushion.
Cut out the center panel of the forward bench face using a plunge-cut oscillating tool to keep cut lines crisp. Re-frame the interior perimeter with light spruce furring strips, then hinge the cut face outward with heavy-duty soft-close hardware.
Locate factory water tanks or wheel wells inside the bench cavity before cutting to ensure clear swinging clearance.
Frame the rear opening with 1×2 pine supports screwed directly into the corner studs to strengthen the bench frame.
Hang the door using bottom drop hinges paired with 15-pound magnetic cabinet latches to prevent rattles on the highway.
With these drop-down doors in place, pair the interior with shallow storage bins that slide out easily. You preserve the original bed platform structure up top while turning dead under-seat cavities into usable storage drawers.
5. Apply Self-Adhesive Shiplap Planks to the Booth Surrounds
Factory camper wallpaper often comes in uninspired beige crosshatch patterns that peel near moisture zones. Adding ultra-thin vinyl or composite shiplap planks transforms the booth nook into a framed architectural feature without exceeding your cargo weight allowance.
Avoid thick residential MDF tongue-and-groove boards, as they add unnecessary weight and swell when condensation builds in cold weather. Stick to hollow PVC planks or 1/8-inch engineered vinyl strips that flex with camper motion on the highway.
Summer heat inside a closed RV softens common peel-and-stick glue quickly. Put a dab of construction adhesive behind every plank and drive an 18-gauge headless pin nail into the internal aluminum or wood wall studs at the plank seams for a lasting hold.
6. Switch Bulky Factory Foam for High-Density 4-Inch Upholstery Foam
Most RV dinette cushions bottom out immediately, leaving your tailbone resting on flat plywood after twenty minutes of remote work. Upgrading the cushion cores to commercial high-density foam completely changes how long you can comfortably sit.
Order custom-cut polyurethane foam with a density rating of at least 2.5 pounds per cubic foot and an Indentation Load Deflection (ILD) between 35 and 40. This gives you firm, responsive support without feeling like a church bench.
Core Replacement Essentials
To fit fresh, firm foam into existing zippered covers, wrap the core in thin dry-cleaner plastic before sliding it in. Once the foam is zipped up and centered, puncture the plastic bag and let the core expand outward into the corners for a tight, tailored fit.
7. Mount Wall-Mounted Leather Straps as Backrest Cushion Anchors
RV backrest cushions like to slip, slide forward, and wedge themselves under the table on travel days. Heavy velcro strips rarely last on wallpaper, but screw-anchored bridle leather straps keep your cushions pinned securely to the wall.
Anchor two vertical leather straps into the interior wall studs behind each seating position. Fasten heavy metal snap buttons or brass turn-buckles at the top so you can release the cushions instantly when turning the dinette into a bed.
Screw brass grommets directly into structural wood or aluminum wall framing.
Use marine-grade snaps that release quickly when flattening cushions for sleeping.
Relying on self-adhesive velcro that gums up and pulls paper off thin wallboard.
Leaving cushions loose so they tumble onto the camper floor on washboard roads.
If wall studs do not align with where you want the straps, fasten a horizontal wood ledger strip across the dinette wall first. Paint or stain it to match your tabletop, then attach the cushion harness straps straight to that secure wood surface.
8. Convert Booth Bases into Slide-Out Wire Basket Pantries
The deep back corners of bench cavities tend to become black holes where canned goods and spare parts get lost. Adding full-extension drawer slides paired with light wire baskets lets you pull out the entire storage run into the center aisle.
Industrial wire baskets keep items visible from above and promote airflow, which helps prevent condensation buildup around exterior camper walls. Build a simple internal 1×2 frame to secure the runner tracks inside the bench framing.
| Storage Style | Full Slide Runners | Drop-In Totes |
|---|---|---|
| Access Ease | Slides straight out into the aisle | Requires clearing cushions and lids |
| Air Circulation | High (open wire grid design) | Low (solid plastic traps moisture) |
| Weight Added | Moderate (slides and light steel) | Minimal (thin plastic tubs) |
Always use drawer runners with positive detent latches or add a mechanical sliding bolt lock to the outside face. Without a solid lock, heavy pantry provisions will slide out and bang against opposite cabinets the first time you take a tight turn.
9. Replace Heavy Pedestal Posts with Folding Wall Brackets for Instant Lounge Space
Standard metal table poles rattle loose over time, wallowing out the floor flanges until your coffee sloshes with every touch. Replacing those posts with heavy-duty locking folding brackets mounted to the slide-out wall lets you drop the table flush in seconds.
These cantilevered brackets support over 200 pounds when locked open and drop flat with a single lever press. When folded, the dinette area opens up into a spacious lounge for reading or stretching out without posts in the way.
Wall-mounted hinge brackets remove the floor pedestals entirely, allowing you to drop the table flat for an open lounge floor plan in under 10 seconds.
Ensure your mounting screws go straight into the camper wall studs or a solid backing plate. Never use hollow-wall anchors in thin RV paneling, as highway vibration will quickly pull them loose under the weight of the table.
10. Brighten the Banquette Wall with Peel-and-Stick Ceramic Look Subway Tiles
The space behind an RV dinette often ends up scuffed from jackets and bags. Light reflective, flexible peel-and-stick subway tiles brighten the dining nook, protect the wallboard, and wipe clean with a sponge.
Look for flexible composite tiles with heat-resistant backings designed for automotive or boat interiors. These move with the camper without cracking, unlike real ceramic tile and rigid grout that break apart on rough backroads.
⚠️ Flexible Seams Matter
Skip standard tile grout. Seal where your peel-and-stick tiles meet the booth frame with color-matched 100% silicone sealant. Silicone stretches as your RV chassis flexes over highway bumps, keeping water and dust out of the seams.
Before applying the tiles, clean the vinyl wall with a 50/50 mix of isopropyl alcohol and water to remove airborne cooking oils. Press every square inch with a wooden roller to bond the pressure-sensitive adhesive firmly to the substrate.
11. Add Recessed 12V LED Strip Lighting Underneath the Bench Overhangs
Harsh overhead RV lighting can make working or dining in the booth feel like sitting in an office breakroom. Tucking an indirect 12-volt warm LED strip under the lip of the bench cushions creates soft, ambient footwell lighting that makes the space feel larger at night.
You can easily tap into your camper’s existing 12-volt interior circuits, such as an under-seat furnace or nearby reading light, without needing an inverter. Use low-draw COB LED strips inside aluminum channels to diffuse the light into a smooth glow with no visible hot spots.
Run the wiring through a discrete mini rocker or touch dimmer switch mounted directly into the wood face of the booth. This gives you quick control right from your seat when switching to evening mode.
12. Fit Tailored Slipcovers with Hidden Zippered Enclosures for Easy Machine Washing
If your cushion foam is still supportive but the floral or beige pattern feels outdated, custom slipcovers offer a simple refresh. Tailored covers made from washable fabrics let you clean off campsite dirt and pet hair in any laundromat washer.
Heavy canvas, bull denim, or poly-linen blends work well for camper cushions. These sturdy weaves resist pet claws, do not pill easily, and hold their shape after multiple wash cycles.
Slipcover Fabric Priorities
If you do not sew, check out fitted stretch velvet or textured knit box-cushion covers. Heavy-duty safety pins or elastic cinch straps placed underneath will keep them pulled drum-tight over the wood backer boards.
13. Cut Down the Table Width by Three Inches to Free Up Hip Room
Factory dinette tables are often wider than necessary, making it an awkward squeeze to slide past the table edge into the window seat. Trimming just two to three inches off the aisle side opens up comfortable hip clearance without losing functional dining space.
Carefully pull off the plastic T-molding along the edges using a putty knife. Use a circular saw paired with a fine-tooth blade and guide rail to make a clean edge cut, then rout a matching groove to tap the molding right back into place.
Hits your hips and thighs every time you slide in.
Leaves little walking clearance in the center aisle.
Forces you to sit completely upright against the backrest.
Slips into the bench seat without catching clothing.
Creates two to three inches of clear aisle space.
Still holds two full-sized dinner plates easily.
If you plan to keep using the booth as an extra bed, double-check your support setup before cutting. Trimming the table width might mean you need to widen the inner wall cleats so the smaller board still spans the gap securely in sleep mode.
14. Install Magnetic Catch Plates to Keep Bench Lids Solid on Rough Roads
Loose plywood bench seats often shift and chatter against their frames while driving, creating annoying squeaks on the road. Fastening heavy magnetic cabinet catches along the bench support cleats keeps everything locked firmly down on travel days.
Look for magnetic catches rated between 15 and 20 pounds of pull force. Position them at the outer corners of each bench framework to stop the lids from bouncing on highway expansion joints.
Screw the magnet bases directly into the solid corner cleats of the bench frames.
Countersink the metal strike plates flush into the bottom of the plywood lids so the cushions sit flat.
Add adhesive-backed felt pads along the framing rails to stop wood-on-wood squeaks as the chassis twists.
The magnets also prevent the seat lids from sliding off their ledges if you have to brake hard. This simple, inexpensive fix keeps your dinette quiet and stable on back roads.
15. Add Recessed Cup Holders Directly into the Wooden Table Surface
Drinks set on an RV table are always prone to spills, whether from people bumping the table as they slide in or campers rocking in strong winds. Drilling out recessed stainless marine cup holders directly into the table edges keeps cups stable and off your work surface.
Use a 3.5-inch hole-saw bit in a drill press or steady hand drill to cut clean openings through your tabletop. Drop in 304-grade stainless marine cup inserts with silicone underneath the outer lips to catch drips and condensation.
Pick cup holders with stepped bases that can hold both narrow aluminum cans and wide tumblers. If the table drops down to make a bed, place the cup holders toward the corners so they do not interfere with sleeping cushions.
16. Mount 120V and Dual USB-C Outlets Flush into the Bench Kickboards
RV dinette tables often end up being used as remote work desks, but factory power plugs are usually hidden out of reach under cabinets. Adding high-speed USB-C outlets and standard 120V plugs directly into the bench base puts power right where you sit.
Keep your wire runs tidy by following existing factory wiring paths behind the bench panels. If tapping into shore power, use a shallow residential remodel box; for 12V USB ports, simple step-down adapters wire right to the house battery.
📌 Depth Clearance Notice
Check behind the kickboard before cutting to ensure clearance from slide-out mechanisms or water lines. Use shallow 1.25-inch electrical boxes so the back of the plug does not crowd storage bins inside the bench.
Pick USB ports with built-in shutoff switches or models without glowing LED lights. Small indicator lights can be surprisingly bright if someone is sleeping on the converted dinette bed across the aisle.
17. Upholster the Kick-Plates with Tough Indoor-Outdoor Ribbed Runner Rugs
The vertical kick-plates on RV booths take a constant beating from dirty hiking shoes and pet paws. Covering those scuffed wood surfaces with ribbed commercial floor runners protects the wood and adds welcome texture to the booth.
Look for low-profile polypropylene ribbed runner rugs with heavy-duty rubber backings. Cut the material to size using a utility knife and secure it around the bench base framing with 1/2-inch stainless staples.
Hides boot scuffs, pet marks, and everyday wear.
Adds thermal insulation over cold slide-out floor gaps.
Scuffs down to the bare luan wood within a few trips.
Shows every speck of kicked trail dust and road grime.
The ribbed texture hides dirt between cleaning stops and cleans easily with a handheld vacuum. It also covers up seam gaps along the floor where slide-out trim rarely meets the subfloor evenly.
Upgrading your camper dining area is all about balancing daily comfort with real travel durability. Making practical updates like trimming table width, improving foam, and easing storage access turns an awkward factory booth into a comfortable spot you will enjoy using every day. Try one or two of these rv dinette booth makeover ideas before your next big trip to see how much more usable your living space can be. Save this list to your RV boards so you have these practical measurements ready for your next project.

