
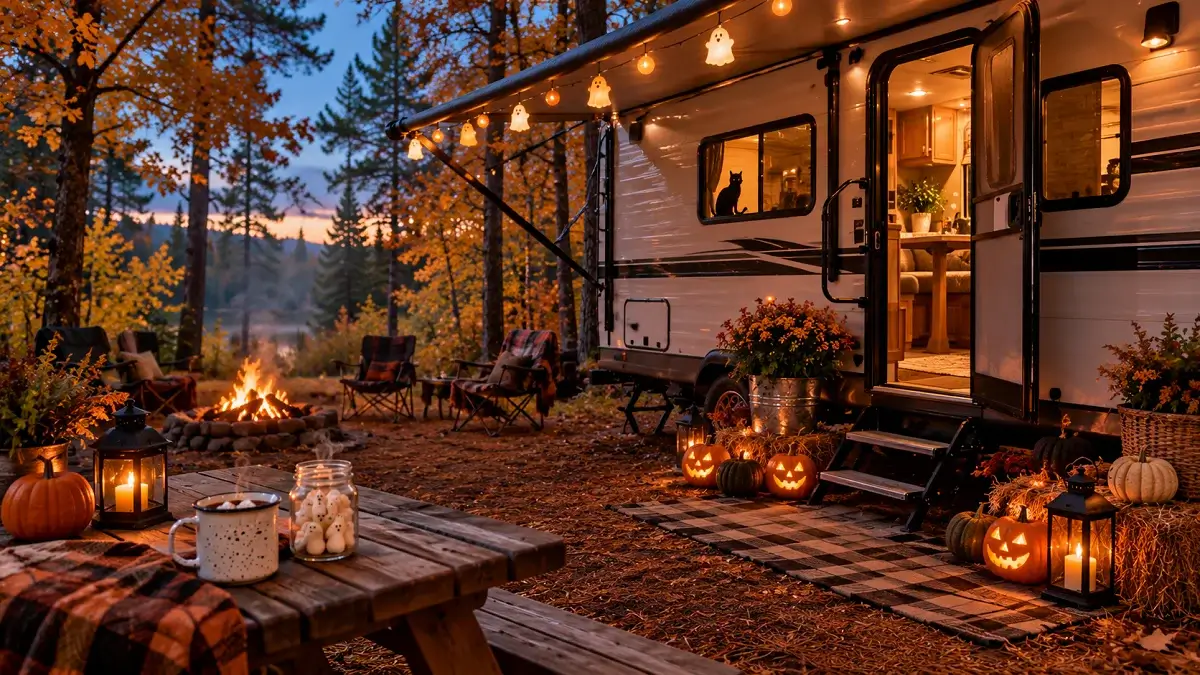
Most seasonal decorating advice assumes you have a wide front porch, a tall attic for storage bins, and unlimited wall space. When you travel in a camper, you quickly learn that standard advice falls apart on the road. Giant ceramic pumpkins shatter in transit, heavy lawn displays steal precious cargo weight, and cluttered countertops make making morning coffee frustrating.
Decorating a moving home takes a different mindset. You want your campsite to feel festive and welcoming for October campground trick-or-treating, but everything you pack needs to earn its spot. The best setups survive sudden mountain winds, store flat between stops, and set up in minutes without putting holes into your rig’s walls.
These practical rv halloween ideas bring plenty of spooky charm to your campsite without stealing your living space. From flat-packing window silhouettes to simple exterior light tricks, here is how to celebrate Halloween on wheels.
1. Hang Glow-in-the-Dark Silhouette Cutouts in the Camper Windows
Standard gel clings look great on residential double-pane glass, but RV windows deal with extreme temperature swings and high humidity. In a camper, those thick rubbery clings often slide down the glass, leave oily residue, or melt when afternoon sun hits the pane.
Flat cardstock silhouettes taped to the glass interior give you sharp, high-contrast outlines that pop the second you turn on your rig’s interior lights. From the outside, your camper turns into a miniature haunted house glowing in the campground trees.
- Black heavy-weight cardstock (65 lb holds its shape best)
- Removable blue painter’s tape or glue dots
- Pencil, scissors, or a craft cutter
Cut out classic spooky shapes like slinking black cats, creeping branches, or peering monsters. Tape them directly to the inside glass, placing them low on the frame so day-night roller shades can pull down smoothly behind them when you want privacy.
Bulky store-bought window clings that slip off during humid nights and leave sticky marks on acrylic camper windows.
Crisp, reusable black paper silhouettes that pack between sheets of wax paper inside a flat file folder.
2. String Low-Draw Amber Ghost Lights Along the Awning Track
Bright white exterior rope lights can feel harsh and tend to pull flying bugs straight toward your entry door. Swapping to warm amber or deep orange globe lights immediately softens your patio area into a warm autumn glow.
Slide-in roller clips make hanging them along the awning utility channel effortless. Look for mini ghost or bat shades that run on standard USB power or standard AA batteries so you do not drain your house battery bank while relaxing off-grid.
- Slide five to seven plastic awning utility hooks into the open roller tube channel.
- Weave your light strand through each hook clip, leaving gentle slack near the motor head.
- Secure the battery box inside the outdoor kitchen hatch or plug the USB adapter into an exterior outlet.
💡 Quick Tip
Always roll your awning in during gusty winds. Keep your light string attached to removable S-hooks so you can unclip the strand in under thirty seconds if a storm rolls in.
3. Transform the RV Entry Steps into a Witch’s Stacked Staircase
Your camper’s fold-out metal steps are the first thing visitors see, making them the ideal spot for a welcoming display. Metal grated steps can look industrial, but a little decorative styling softens the entryway without blocking access.
Faux gourds, small woven baskets, and solar tea lights add instant warmth. Use weather-resistant materials that handle morning dew and muddy shoes without getting ruined.
| Step Level | Item to Place | Secure Method |
| Top Step | Low-profile coir welcome mat | Built-in rubber step rug springs |
| Middle Step | Foam carved pumpkin with LED tealight | Hook-and-loop velcro coin on base |
| Ground Step | Pair of pointed witch boots filled with mini mums | Heavy river stones placed inside the soles |
Make sure to leave at least twelve inches of clear walking path on one side of each tread so everyone can get in and out safely after dark.
4. Turn the Spare Tire Cover into a Giant Glowing Jack-o’-Lantern
The rear bumper is often an overlooked canvas. If you carry a standard vinyl spare tire cover on the back bumper or tongue, you already have the foundation for an eye-catching outdoor decoration.
Black vinyl transfer film sticks smoothly to standard tire covers without damaging the underlying material. You can peel the shapes off once November arrives, leaving zero sticky residue behind.
- Roll of outdoor removable vinyl or black adhesive craft sheets
- Microfiber cloth and rubbing alcohol for surface cleaning
- Solar-powered spotlight mounted on the rear stabilizer jack
Wipe the tire cover thoroughly to clear off road dust before sticking down the triangle eyes and jagged smile. Aim a small warm-toned solar lawn light up at the cover from the ground so drivers behind you at the campsite see the face glowing after dusk.
What to grab first
5. Set Up a Campfire Witch’s Cauldron for Cider and S’mores
Gathering around the fire ring is the highlight of chilly fall evenings at the campground. You can give your fire pit an immersive storybook feel by hanging a cast-iron dutch oven from a folding campfire tripod.
Simmering spiced apple cider over low coals fills your entire campsite with the smell of cinnamon and roasted fruit. When you finish drinks, the heavy pot easily swaps out for a bowl of treat bags or s’more supplies.
- Cast iron dutch oven or enameled camp pot
- Campfire cooking tripod with adjustable chain
- Mulling spices (cinnamon sticks, star anise, orange slices)
- Enamel camp mugs hung on an outdoor mug tree
Keep the pot resting high above direct flames so the cider warms slowly without boiling over. The rising steam against the evening firelight looks just like a bubbling potion.
6. Add Removable Cobweb Corner Ties to Interior Cabinet Faces
Traditional fake cotton cobwebs make a huge mess inside an RV. The synthetic strands snag on cabinet hinges, latch mechanisms, and window slide seals, shedding fuzzy pieces for weeks afterward.
Delicate lace or crochet spiderweb valances give you the same haunted cabin look without the shedding. You can tie or clip them directly to the upper corners of your overhead camper cabinetry using clear removable mini hooks.
| Web Style | Best Feature | Removal Cleanup |
| Traditional Polyester Fiber | Inexpensive and stretchy | Leaves sticky fibers caught in slide seals |
| Laser-Cut Felt Webs | Reusable and lays flat | Five-second cleanup with zero shedding |
| Black Cotton Lace Runners | Drapes over corner valances | Folds into a drawer for next season |
Hang two matching triangular lace webs in opposite corners of your main living room slide. The dark lace frames your woodwork beautifully while keeping the center of the walkway completely unobstructed.
| Feature | Polyester Stretch Web | Lace & Felt Webbing |
|---|---|---|
| Slide Safety | Risks catching on slide wipers | Lays completely flat |
| Reusability | Single-use disposable | Packs away for years |
| Storage Footprint | Small bag | Flat zip-top envelope |
7. Create a Bunkhouse “Bat Cave” Using Lightweight Hanging Felt
Camper bunk rooms are natural cozy nooks that kids love transforming for holidays. Instead of heavy wall hangings, a lightweight flutter of pre-cut felt bats turns the lower or upper bunk into an adventurous cave hideaway.
Use standard spring-loaded tension curtain rods across the bunk entrance. This lets you string garlands and drape sheer charcoal mesh fabric without poking holes or leaving adhesive tape marks on camper wall panels.
- Measure the width of your bunk entryway and fit a small adjustable spring tension rod into place.
- Clip a lightweight panel of open-weave black cheesecloth across the rod using plastic rings.
- Fasten three-dimensional felt bats along the fabric folds using mini wooden craft clothespins.
Twist a rubber-tipped tension rod securely between the bunkhouse door jambs.
Drape unhemmed black or moss-green gauzy cheesecloth over the crossbar.
Clip pre-creased 3D cardstock bats to the netting to create an upward flight pattern.
8. Line Your Campsite Walkway with Solar Skull Pathway Stakes
Campground loops can get very dark at night, especially beneath heavy oak and pine canopies. Adding low-lying glowing pathway markers keeps trick-or-treaters safe from hidden tree roots, utility cords, and campsite leveling blocks.
Plastic solar skull or pumpkin ground stakes charge during the daytime while you are out hiking and turn on automatically at dusk. They illuminate the edge of your outdoor rug and guide visitors right to your candy bowl.
- Set of 4 to 6 solar LED pathway stakes
- Small rubber mallet for driving stakes into compacted gravel
- High-visibility glow tape wrapped around low guy lines
Place stakes at least eighteen inches away from your camper’s sewer hose connection and utility hookup bay. That keeps the walking lane wide and prevents guests from stumbling into sensitive hoses in the dark.
Place stakes along the firm, open path leading straight to your entry steps.
Angle solar collectors toward open sky before the campsite canopy blocks direct sun.
Do not run thin electrical cords across gravel paths where kids can trip.
Never plant metal stakes over buried campground electrical and water lines.
9. Display Mini Velvet and Fabric Pumpkins on Dinette Table Runners
Real carving pumpkins are an October tradition, but they present headaches on the road. Carved gourds rot quickly in heated RV interiors, attract fruit flies, and can cause delays at border or state agricultural inspection stations.
Soft velvet and knit fabric pumpkins deliver warm autumnal texture without any of the mess. Their soft foam cores are completely quiet on travel days, so you can leave them right on the table without worrying about road vibrations chipping ceramic edges.
- Knitted sweater pumpkins in forest green, rust, and ivory
- Woven jute or burlap runner cut to fit your dinette table width
- Small dollop of removable mounting putty beneath each pumpkin
Layer three assorted sizes down the center of your table runner. Because fabric pumpkins weigh almost nothing, you can stash them directly in the overhead cabinet bin when packing up for travel day.
📌 Good To Know
States like California and Florida have strict agricultural checkpoints that prohibit hauling untreated raw citrus and field pumpkins across state lines. Fabric gourds bypass every checkpoint restriction effortlessly.
10. Hang a Haunted Campsite Chalkboard Sign from the Hitch Jack
The front A-frame and electric tongue jack of a travel trailer or 5th wheel pin box often stand out as plain industrial steel. Turning that structural hardware into a decorative signpost instantly ties your entire campsite theme together.
A lightweight wooden chalkboard hung from the tongue jack allows you to customize your message at every new destination. Write welcoming trick-or-treat hours, share your campsite number, or sketch a funny spooky greeting.
- Loop heavy-duty outdoor bungee straps or zip ties through the hanging holes of your chalkboard.
- Fasten the sign snugly around the upper post of the electric tongue jack housing.
- Use dustless liquid chalk pens to write your message so rainy campsite fog will not smudge the lettering.
Wrap rubber foam pipe insulation around your hitch bracket before hanging signs so metal hardware never chips your rig’s powder-coated frame.
11. Swap Everyday Kitchen Linens for Spooky Buffalo Plaid Dish Towels
RV kitchens are notoriously tight on counter space. Adding decorative statues, ceramic witches, or bulky knick-knacks next to the sink leaves you with nowhere to set a cutting board or wash a skillet.
Decorative textiles solve the problem instantly because they take up zero additional square inches. Swapping out your daily microfiber cloths for seasonal dish towels brings rich autumn color straight to your oven handle, towel bar, or fold-down cooktop cover.
- Cotton waffle-weave towels in deep forest green and charcoal buffalo check
- Towels embroidered with vintage skeletons, ravens, or retro camp trailers
- Velcro or snap-on hanging loops that keep towels from sliding off handles on travel days
Because towels do double duty as practical drying cloths and instant holiday accents, they earn their spot in small camper drawers. Pack three or four folded flat under the sink, rotating them out as they head to the campground laundry.
- ▸Functional decor: Dry dishes and wipe down counters without moving decorative items off the counter.
- ▸No travel rattles: Soft fabrics make zero sound when driving over bumpy washboard dirt roads.
- ▸Zero storage penalty: Folds completely flat into existing galley drawers when November hits.
12. Project Floating Spirits onto the Rig’s Exterior Slide Wall
The broad, flat fiberglass side of an RV slide-out makes an incredible, cinematic projection screen. Instead of stringing up dozens of plastic skeletons that blow around in the breeze, a small LED projector turns the side of your camper into a living movie backdrop.
Compact, low-draw holiday projectors cast floating ghosts, falling autumn leaves, or creeping spiders across the exterior wall. It is high-impact visual theater with virtually zero physical storage footprint.
- Set the projector on a stable picnic table bench or camp chair approximately ten to fifteen feet from the rig.
- Plug the power cord into an exterior GFCI outlet or a portable power station.
- Angle the lens upward toward the largest unbroken slide-out wall and lock the tilt thumbscrew.
13. Craft a Creepy Skeleton Passenger for the Driver and Copilot Seats
If you drive a Class A, Class C, or camper van, your cockpit chairs sit prominently on display through the front windshield. When parked at camp, buckling a poseable skeleton into the captain’s chairs brings huge smiles to passing campers.
Dress your bony co-pilot in a cozy flannel shirt, a vintage trucker hat, and dark aviator sunglasses. Position one hand resting casually on the steering wheel and the other holding an empty camp coffee mug.
- Full-size 5-foot plastic poseable skeleton with locking joint screws
- Thrift store plaid button-down shirt and ball cap
- Reusable hook-and-loop cable ties to hold arms in place
Turn the driver’s chair slightly toward the campsite patio. At night, a soft green or purple battery puck light tucked into the footwell highlights the bony outline through the cab glass without blinding your neighbors.
⚠️ Watch Out
If you leave your passenger buckled in while driving down the highway, ensure no hats, scarves, or joints block side mirrors or blind spot sightlines. Double-check your state laws regarding front passenger seat decorations.
14. Wrap the Screen Door with Mummy Gauze and Big Googly Eyes
Traditional thick autumn wreaths look wonderful, but they create a major hassle on an RV entryway. Exterior camper doors have tight clearances, and hanging a deep wreath means the door cannot swing fully open or latch against the exterior sidewall latch.
Wrapping your inner screen door with white cheesecloth turns the entire doorway into an interactive mummy face. The material is so thin that the exterior solid door can latch closed over it without catching or binding on rubber weather seals.
| Door Decoration | Door Functionality | Storage & Packing |
| Traditional Grapevine Wreath | Door cannot clip to the exterior side wall | Bulky, brittle, and crumbles inside storage bays |
| Magnetic Door Banners | Slips off non-magnetic aluminum frames | Rolls up, but can flap loudly in wind |
| Mummy Gauze Door Wrap | Door latches and swings completely freely | Compresses into a sandwich bag for travel |
Secure two giant paper plate googly eyes near the middle push-bar of the screen door. Then crisscross strips of gauze across the wire mesh, taping the edges to the inner door frame with low-tack masking tape.
A heavy front-door wreath that crushes against the outer wall, pops off the latch, and scatters fake pine needles across the patio.
A flat gauze mummy wrap that lets the screen swing smoothly, keeps bugs out, and packs down to the size of a pair of socks.
15. Build a Glow Stick “Ghost Lantern” Station for Trick-or-Treaters
Many campgrounds host lively community trick-or-treating weekends throughout October. In an outdoor campground loop filled with dark roads and bicycle traffic, non-candy glowing prizes are often the biggest hit with both kids and parents.
Fill clean, wide-mouth mason jars or frosted gallon jugs with warm yellow, green, and orange glow sticks. Draw whimsical spooky faces on the plastic jugs using a broad black marker to create lanterns that light up your treat table.
- Set up a small folding side table near your campsite entry rug.
- Arrange frosted jugs drawn with jack-o’-lantern grins along the back edge of the table.
- Fill shallow wooden caddies with glow bracelets, stickers, and allergy-friendly fruit snacks.
What to grab first
16. Dress Up the Bumper or Ladder with Weatherproof Climbing Ghouls
The rear exterior ladder on a camper is a fantastic vertical anchor for outdoor holiday decor. Its sturdy aluminum rungs let you pose life-sized skeletons or hooded climbing ghouls that look like they are scrambling right up toward the roofline.
Lightweight, hollow plastic skeletons work best because they shed rain and do not soak up moisture like stuffed fabric props. Use reusable UV-resistant zip ties or hook-and-loop wrap straps to secure the wrists, elbows, and ankles firmly around the ladder rails.
- Hollow plastic poseable skeleton (4 to 5 feet tall)
- 12-inch heavy-duty UV-resistant black cable ties
- Flush-cut wire snips for trimming tie ends cleanly
Pose the figure with one hand reaching for the top rung and the other gripping a lower rung. Double-check that your tail lights, rear backup camera, and license plate frame stay completely clear and unobstructed from every angle.
Anchor limbs in at least four places using rubber-coated or UV-rated straps.
Take the skeleton down before driving down highway speeds to avoid wind strain.
Never stick permanent adhesive hooks to fiberglass or painted aluminum panels.
Avoid letting bones swing freely where wind could scuff the camper clear coat.
17. Add Warm Orange Puck Lights to the Under-Cabinet Night Tracks
Camper factory ceiling lights can be glaringly bright, especially when you are settling down for an autumn movie night. Tucking battery-operated LED puck lights under the kitchen cabinets or dinette frame creates a warm, candle-like glow near floor level.
Opt for remote-controlled color-changing pucks with warm amber and deep pumpkin-orange settings. They cast a cozy glow downward without shining straight into anyone’s eyes while lounging on the sofa.
- Wipe down the underside lip of your upper cabinetry using a dry microfiber cloth.
- Press a small strip of blue painter’s tape to the wood, then stick the light’s adhesive pad directly onto the tape.
- Set the wireless remote to the gentle amber pulse or steady warm candlelight mode.
The painter’s tape trick creates a protective barrier, ensuring you can pull the adhesive off at the end of the trip without peeling thin RV vinyl cabinet veneers.
Apply low-tack blue painter’s tape along the underside lip of the overhead cabinet face.
Press the adhesive backing of each puck light firmly against the tape surface.
Use the included timer feature to shut lights off automatically after two hours.
18. Host an Outdoor Spooky Movie Night with an Awning Screen
Few things feel cozier than wrapping up in a warm wool camp blanket and watching a classic autumn movie under the stars. Your camper awning arms provide the ideal overhead structure for hanging an ultra-light wrinkle-free projector screen.
Pair a mini pocket projector with a portable Bluetooth speaker placed right on the picnic table. This keeps the audio centered close to your seating area so you do not disturb neighboring campsites across the road.
- 100-inch polyester folding projection cloth with reinforced metal grommets
- Carabiner clips or reusable rubber gear ties for the awning roller
- Insulated camp throw blankets and outdoor floor cushions
Set the screen against the side of the trailer so the canvas blocks any evening breeze. When the movie wraps up, fold the screen like a bedsheet and slide it under a sofa cushion in seconds.
19. Make “Monster Mouth” Entry Mat Accents at the Base of the Stairs
October camping often brings wet fall leaves, mud, and gravel straight toward your doorway. Swapping your standard outside doormat for a playful monster-themed rug traps dirt outside while giving trick-or-treaters a fun first step.
Layering a small, seasonal rubber-backed coir mat over a wide buffalo plaid woven runner creates an inviting, styled entryway. You get dependable mud scraping along with clean autumn visual contrast.
| Mat Style | Dirt-Scraping Performance | Wet Weather Handling |
| All-Natural Thick Coir | Excellent on dry mud and twigs | Soaks up puddle water and dries slowly |
| Rubber Backed Low-Pile | Good scraping with steady grip | Sheds morning dew and rinses with hose |
| Layered Plaid Under-Mat | Frames the entry visually | Shake clean and machine wash easily |
Use heavy-duty outdoor rug clips or tent stakes at the corners of the base runner if you are set up on grass or pine needles so autumn winds do not flip the edges up.
| Layer | Recommended Material | Campground Advantage |
|---|---|---|
| Base Accent | Woven polyester buffalo plaid | Wide coverage prevents track-in |
| Top Scraper | Heavy rubber with monster print | Scrapes gravel from boot treads |
| Corner Anchors | Flat low-profile metal ground pegs | Eliminates nighttime trip edges |
20. Pack a Spooky Hot Cocoa Bar on the Picnic Table or Outdoor Kitchen
After an evening walk through the campground loop, nothing warms hands faster than a hot, steaming mug of cocoa. Setting up a dedicated hot drink caddy on your fold-down outdoor kitchen shelf or picnic table keeps people outside chatting by the fire.
Stash all your toppings in lidded mason jars packed inside an easily portable wooden drink caddy. Add ghost-shaped marshmallows, crushed peppermint, and cinnamon sticks that visitors can drop right into their cups.
- Keep a large thermos or vacuum-insulated carafe filled with hot chocolate on the table.
- Set out stackable enamel mugs beside jars of mini ghost marshmallows and chocolate sprinkles.
- Add festive chalkboard labels identifying dairy-free and traditional cocoa options.
When the campfire dies down, the entire station packs right back into a single snap-lid plastic tote that stores safely in your front pass-through storage bay away from campground critters.
Always store sweet drink toppings and marshmallows inside airtight latching bins at night so curious campground raccoons and mice do not pay your campsite a midnight visit.
Bringing the Magic to Camp
Celebrating October on wheels proves that you do not need a stationary house or giant storage bins to build memorable holiday traditions. The most rewarding rv halloween ideas come down to smart choices: lightweight textiles, warm ambient lighting, and flat-packing pieces that handle travel day bumpiness without skipping a beat.
Pick three or four of these easy moves for your upcoming autumn campout, set the campfire kettle on the coals, and enjoy the cozy atmosphere. Save this list for your next fall road trip so you always have festive campsite inspiration ready to go.

