
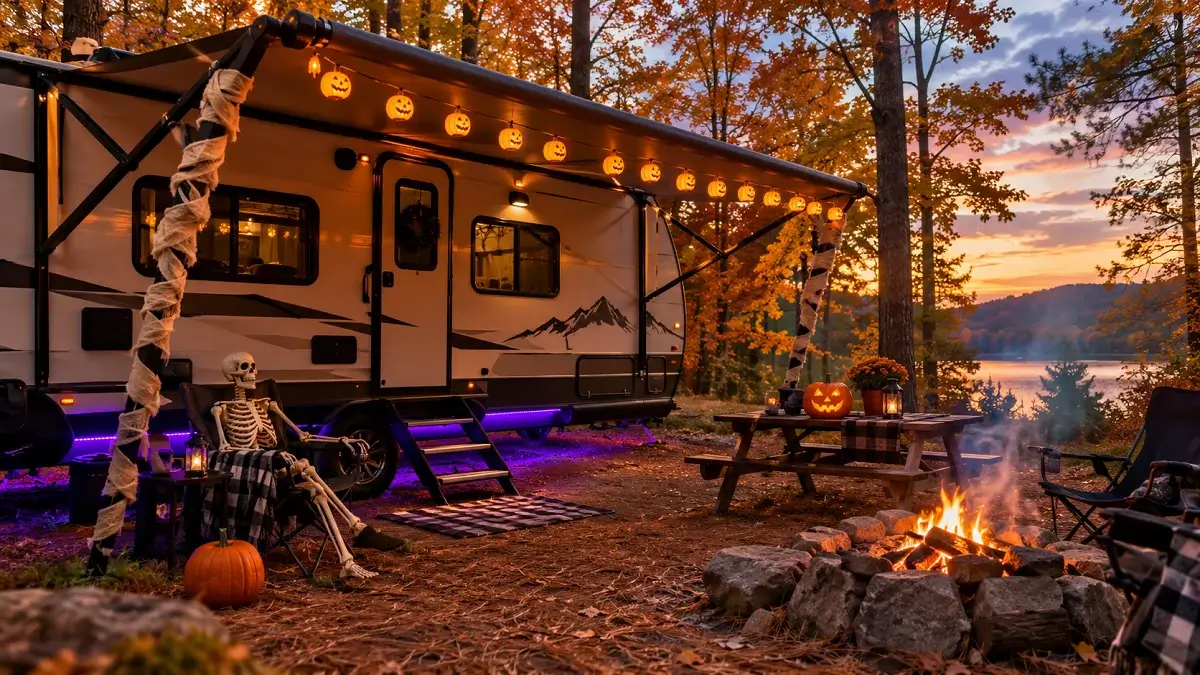
Pulling your rig into a state park during October usually means seeing a sea of beige fiberglass and matching folding chairs. Setting up fun Halloween camp decorations often sounds better in theory than in practice, especially when you consider high winds, sudden rainstorms, and small storage bays. Many campers buy bulky plastic props from department stores, only to find they take up half a bunk bed during transit or shatter when wind blows across the loop.
Creating a memorable campsite does not require spending hundreds of dollars or hauling giant containers across state lines. The trick is choosing decorations that pack flat, fasten securely to your camper without ruining the finish, and hold up against brisk autumn weather. With the right mix of lighting, textures, and clever attachment points, you can make your site feel inviting for neighborhood trick-or-treaters while keeping setup simple.
These practical ideas will help you dial in your rv halloween exterior decor so your spot stands out on the loop while remaining completely road ready.
1. Wrap Your Awning Arms in Spooky Burlap Mummy Bands
Your awning hardware gives you two large, vertical metal struts right at the front of your outdoor patio space. Instead of leaving them as cold black or silver bars, turn them into weathered mummy limbs using torn strips of garden burlap.
Burlap handles outdoor moisture much better than cotton gauze or toilet paper, which turn into soggy pulp after a morning dew. It also has a loose weave that allows gusty winds to pass right through without acting like a sail.
- Cut natural burlap into strips roughly four inches wide.
- Fasten the top and bottom with brown hook-and-loop straps rather than duct tape.
- Tuck two oversized yellow cardboard eyes under the top wrap.
Bare metal awning arms that blend into the camper wall and offer zero campsite character.
Textured, earthy burlap wraps that survive misty mornings and peel off in seconds before pack-up.
2. Clip Floating Jack-o’-Lantern Buckets Along the Awning Track
The utility roller channel on your awning roller tube is built to hold slide-in poly cord hangers. You can repurpose classic dollar-store orange trick-or-treat pails into an overhead lantern canopy that lights up your picnic area.
Drill two drain holes in the base of each plastic pumpkin so rain does not pool inside. Drop battery-powered amber tea lights inside each bucket, then slide them onto the channel spaced two feet apart.
- Slide plastic awning clips into the roller track before raising the awning to full height.
- Hook one lightweight pail per clip using zip ties threaded through the bucket handle.
- Switch on timer-enabled tea lights so your patio automatically illuminates at dusk.
⚠️ Watch Out
Never hang heavy ceramic or glass lanterns from an extended awning. Use hollow plastic buckets weighing under four ounces each to prevent bending your roller tube in a sudden gust.
3. Stake a Glowing Skeleton Crew Around the Fire Pit
Plastic anatomical skeletons make a huge impression when you place them in natural camping poses around your fire ring. Instead of hanging them flat against a wall, arrange them in camping chairs as if they are swapping stories.
Use clear zip ties to lock their wrists around roasting sticks or an old guitar. Anchor their pelvis areas to the camp chairs with small bungee cords so a stiff breeze does not send them tumbling into the gravel.
If you leave the campsite for dinner, collapse the skeletons flat onto the chair cushions. It keeps curious campground dogs from pulling off the arm bones while you are gone.
4. Hang Removable Glow-in-the-Dark Bats in the Rig Windows
Camper windows are ideal display real estate because whatever you hang inside stays completely safe from morning frost, wind, and rain. Cut silhouettes of roosting bats out of black cardstock and affix small glow sticks to their backs.
When your interior cabin lights run in the evening, the silhouettes look bold and crisp from the road. When you turn down the cabin lights for bed, the glow accents continue to cast a gentle green light into the campsite.
Glass-Safe Hanging Supplies
Stick to the inside surface of the glass only. Exterior window tinting on newer rigs can scratch easily if you use rough adhesives on the outside pane.
5. Build a “Caution: Zombie Outbreak” Campsite Entryway
Campgrounds can get dark quickly, and low guide wires or ground stakes are common trip hazards for neighborhood kids. You can turn your boundary lines into a bold zombie containment zone that looks festive while keeping foot traffic on the cleared path.
Drive two tall green garden stakes into the turf near your site marker post. String yellow barrier tape between them, anchoring the bottom edge with lightweight plastic chains that flutter in the wind.
Illuminate ground boundaries with solar-powered low-profile ground pucks.
Keep all decorative caution tape at least three feet back from the campground roadway.
Do not tie barricade tape to shared campground utility pedestals or water spigots.
Avoid thin black monofilament wire that pedestrians cannot see in low light.
Keep the pathway wide enough for wagons and strollers. A clear walkway prevents excited trick-or-treaters from cutting across your fresh water supply hose.
6. Turn Your Trailer Tongue Jack into a Friendly Outdoor Monster
That bulky electric tongue jack sitting right at your camper hitch does not have to be an eyesore. With a weatherproof witch hat, a pair of lightweight oversized craft eyes, and some zip ties, you can turn that metal post into a whimsical campsite greeter.
Because the jack housing is waterproof and mounted low to the ground, it sits right at eye level for kids walking the loop. It creates immediate curb appeal without requiring extra ground stakes or taking up room on your outdoor patio rug.
Slip an inexpensive pointed black witch hat directly over the motor head of the jack, securing the inner brim with a removable hook-and-loop strap.
Affix two waterproof foam eyeballs to the upper casing using outdoor mounting putty that peels away cleanly when packing up.
Drape shredded dark green gauze around the propane tank cover right behind the jack to complete the monster hair backdrop.
Always leave the emergency manual crank socket and water drain holes uncovered. That way, if you need to hitch up quickly in bad weather, you will not have to disassemble your entire monster display in the dark.
7. Layer a Buffalo Check Outdoor Mat with a Cobweb Welcome Rug
Your RV entry steps see constant shoe traffic, which means whatever you put down needs to handle tracked gravel, pine needles, and morning grass dew. Layering two contrasting mats right at the bottom of the fold-out stairs creates a polished look that doubles as a mud trap.
Start with a broad, flat-woven polypropylene outdoor rug featuring an earthy dark green or black buffalo check pattern. Center a smaller, heavy coir or natural rubber mat over it printed with a spiderweb design.
The textured top mat scrapes leaves off sneakers, while the wide bottom mat catches falling gravel before it gets carried inside. Anchor the four outer corners with flat tent stakes if your campsite has dirt or sod ground.
8. String Solar Spiderweb Lights Across the Underbelly Glow Channel
Most modern travel trailers and fifth wheels feature a clean I-beam frame rail along the lower sides. Stringing purple or warm amber micro-LED lights under this edge produces an eerie undercarriage glow that makes your rig look like it is hovering above the grass.
Standard 120V household holiday lights require running outdoor extension cords across damp campsite soil. Going with compact solar or battery units keeps your setup clean and avoids tripping your GFCI pedestal breaker.
| Feature | Solar Stake String Lights | 12V Direct Frame Clips |
|---|---|---|
| Power Draw | Zero camper battery use | Draws from house batteries |
| Weather Rating | Waterproof ground panel | Needs sealed wire taps |
| Setup Speed | Fast ground stakes | Requires mounting clips |
Stick magnetic cable clips directly to the steel I-beam to secure the strands. Never run string lights across moving suspension parts, brake wire harnesses, or leveling jack legs.
9. Dress the RV Entry Handrail with Witch Broomsticks and Twine
Your fold-out camper entry handle is one of the most prominent items next to your door. You can dress it up for the season by wrapping it with miniature cinnamon-scented craft broomsticks bound by natural jute twine.
This adds a subtle fall aroma right as you step into the camper while giving your entry door a rustic, handmade touch. The key is preserving full hand clearance so people can still grab the rail firmly while climbing up the metal steps.
💡 Quick Tip
Fasten the decorative brooms solely to the vertical outer edge of the rail using soft twine. Leave the entire inner grip clear so family members have a firm, unobstructed handhold when stepping down after dark.
Use natural fiber twine rather than zip ties here. If an edge rubs against your knuckles as you climb inside, soft twine will not scratch your fingers the way a trimmed plastic zip tie can.
10. Turn Your Bumper Hitch Cargo Carrier into a Creepy Graveyard Scene
If your rig has a rear hitch-mounted cargo tray, you have an elevated stage waiting to be turned into a miniature cemetery. Because the tray is raised off the wet lawn, your props stay clean and dry all weekend long.
Line the metal rack mesh with outdoor landscape fabric, then position two lightweight foam gravestones anchored through the bottom slats. Fill the empty space around the bases with faux skulls, outdoor battery candles, and weathered Spanish moss.
The tray keeps your decorations tucked behind the camper where curious campground wildlife will not trample them. When Sunday rolls around, cut the zip ties, pack the moss into a plastic grocery bag, and your carrier is instantly ready for your storage totes.
11. Drape Weatherproof Ghost Windsocks from the Slide-Out Corners
The lower structural flange of an extended slide-out box provides a sheltered, elevated mounting spot for flowing ghost windsocks. Hanging them here keeps them out of heavy rain while allowing natural campground breezes to catch the fabric and give them realistic motion.
Traditional outdoor windsocks made of heavy polyester dry quickly and will not cling to camper side walls like wet cotton sheets. Use rubber-coated spring clamps on the exterior gutter lip or the underside edge of the slide-out wall.
Slide-Safe Hanging Checklist
Never clip mounting hardware directly onto the black rubber wiper seals. Keeping attachments on the solid aluminum trim protects your slide seals from tearing when winds pick up overnight.
12. Convert the Campsite Picnic Table into an Open-Air Potion Station
Campsite picnic tables are often rough, weathered wood or cold metal mesh that looks bare under outdoor awning lights. Converting the tabletop into an interactive potion display creates an inviting gathering hub right in the center of your site.
Cover the table with a washable, dark brown oilcloth or flannel-backed vinyl tablecloth secured by plastic table clamps. Arrange a grouping of dark amber glass jugs, wooden stirring spoons, and battery-lit mason jars filled with faux green moss and plastic insects.
Keep decorative prop bottles strictly separate from real food and drink coolers so curious kids never mistake craft liquids for sweet apple cider.
If you plan to serve real warm drinks like hot cocoa or spiced cider, designate one clear end of the table for insulated thermoses and paper cups. Use a distinct chalkboard sign so visitors know which items are made for enjoying.
13. Frame the Front Camper Cap with Magnetic Spiderweb Decals
The broad front profile of a travel trailer or fifth wheel offers a wide, flat canvas that directly faces the campground road. Magnetic or reusable vinyl spiderwebs frame the front corners cleanly without leaving sticky tape residue on gel-coat finishes.
Many modern fiberglass caps do not hold regular magnets, but steel rock guards and painted lower metal diamond plates make excellent mounting surfaces. For smooth high-gloss gel coat, choose heavy-duty outdoor static clings or gentle silicone grip pads.
📌 Good To Know
Test your camper front with a small kitchen magnet before purchasing heavy magnetic sheets. If your front wall is molded fiberglass or composite, switch to suction-backed clips or removable silicone-gel mounting squares instead.
Wipe the surface with a clean microfiber cloth and warm water before applying your decals. Removing road dust and bugs first ensures your clings stay firmly attached even during gusty evening downpours.
14. Park a “Ghostly Camper Driver” in the Cabover or Dinette Window
Window cutouts make incredible display frames because you can illuminate them from inside the camper cabin. Positioning a life-size skeleton, witch, or glowing mannequin bust behind the glass makes it look like a spooky passenger is steering the rig.
In a Class C motorhome or truck camper, the cabover bed window sits directly above the windshield, providing prime viewing height for anyone strolling through the loop. In a standard trailer, the large dinette window serves the exact same purpose.
A fun, realistic costumed figure wearing a plaid camping shirt and trucker hat visible through tinted glass.
A single amber puck light positioned beneath the chin casts a high-contrast, eerie silhouette across the entire campground.
Set the accent puck light on a simple six-hour shutoff timer. That way, the display turns off automatically while your family sleeps without draining your house battery bank overnight.
15. Set Up a Self-Serve “Trick-or-Treat” Trunk Station on the Rear Bumper
Campground trick-or-treating often draws dozens of costumed kids all walking the loop at the same time. Setting up an organized candy dispensary on your heavy square rear bumper keeps foot traffic out of your living space while making grab-and-go treats easy for young visitors.
A flat utility storage tray or wooden crate clamped to the steel bumper bar holds treat bags neatly at waist height. Adding a small battery spotlight overhead ensures kids can see the choices clearly without tripping over rear stabilizer jacks.
Clamp a wide, shallow galvanized tub or wooden harvest crate securely to the square rear steel bumper with two heavy-duty ratchet straps.
Line the container with bright orange outdoor napkins and separate individual treat bags into neat, easy-to-grab rows.
Clip a broad-beam solar motion light to the bumper spare tire mount to illuminate the treats automatically whenever kids approach.
Stock a separate bowl with fun, non-food treats like glow bracelets, spooky stickers, or mini compasses. It makes your camper a welcoming stop for young trick-or-treaters who manage food allergies while out on the road.
Making Your Campsite Stand Out This Fall
Decorating your campsite for the fall season is all about creating warmth and fun without turning setup and pack-down into a headache. By choosing lightweight props that pack flat into your storage pass-through bays, you spend far less time wrangling plastic totes and more time relaxing around the campfire. The right outdoor touches make your rig feel welcoming to neighboring campers while keeping your setup wind-safe and weatherproof all weekend long.
Save this list to your favorite Pinterest camping or Halloween board so you have these practical exterior decor ideas ready for your next autumn rally!

