
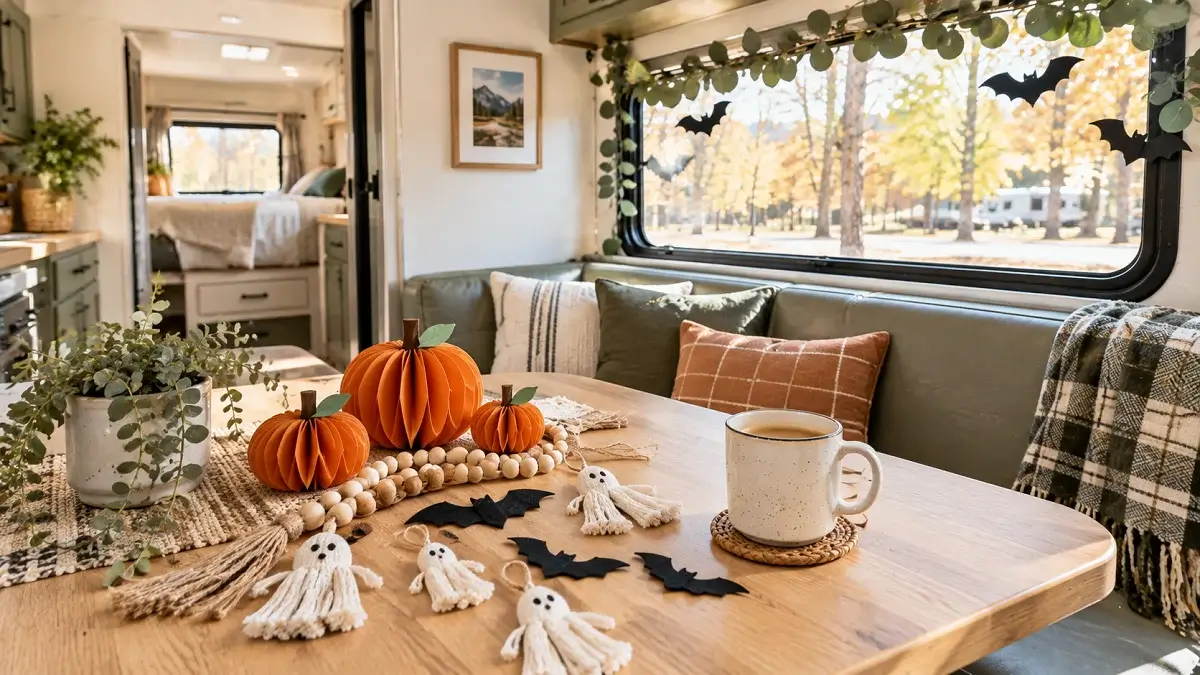
Living in an RV or heading out for a crisp fall camping weekend means you do not have attic space for bulky plastic skeletons or heavy ceramic jack-o’-lanterns. When square footage is tight, seasonal decorating can feel like a storage trap. Most traditional holiday crafts simply take up too much space or end up rattling off the walls the moment you hit highway speeds.
The secret to decorating a camper is choosing pieces that store completely flat, weigh next to nothing, and pack away into a single plastic sleeve when November rolls around. You can build genuine holiday charm inside your rig without sacrificing a single inch of your under-bed storage or pantry room.
These diy rv halloween decorations focus on lightweight materials, clever hanging tricks, and flat-pack builds you can put together at the campsite table this weekend. Every project stays firmly in place during travel days and cleans up without leaving sticky tape residue on your camper walls.
1. Turn Standard Paper Lanterns into Hanging Jack-o’-Lanterns
Round paper lanterns give you instant volume inside a camper without adding any weight to your ceiling trim. You can buy bright orange accordion lanterns at any craft store, paint simple grin triangles with black acrylic paint, and suspend them from the slide-out fascia using clear plastic hooks.
- Use battery-operated micro fairy lights inside rather than incandescent bulbs to prevent heat buildup.
- Keep your painted facial expressions simple so the lantern folds completely flat without cracking the paint.
- Pack them inside a two-gallon zip-top bag between seasons so the wire stretchers do not bend out of shape.
When travel day arrives, pop out the internal metal wire expander and slip the flattened lantern flat against the bottom of your dinette bench.
2. Craft Macrame Ghost Tassels for Cabinet Pulls
RV cabinet hardware is built for utility, but it also makes the ideal anchor point for small holiday accents. Ghost tassels made from soft cotton macrame cord hang quietly while you drive, meaning they will not bang against your wood cabinet fronts on bumpy roads.
- Cut eight strands of cream cotton macrame cord to twelve inches each.
- Fold them over your finger, wrap a ninth strand tightly around the neck, and secure it with a lark’s head knot.
- Glue two small black wooden beads onto the tassel head using fabric glue for simple eyes.
These little ghosts add a soft seasonal texture without cluttering counter space. They slip off the cabinet knobs in seconds when you want to wash down the kitchen.
💡 Rattle-Proof Tip
Trim the cotton tails so they finish an inch above the lower latch button. This stops stray threads from snagging in the door catch when you pull cupboards open.
3. Build Magnetic Spider Webs for Your Steel Entry Door
Most RV entry doors have steel cores on the interior side, which means you can skip tape entirely and rely on craft magnets. Standard tape leaves a gummy residue in hot climates that collects desert road dust, while craft magnets pull off cleanly every single time.
- Cut black craft yarn or thin parachute cord into four concentric circles.
- Tie eight radial spokes from the center out using simple overhand knots.
- Glue tiny neodymium disc magnets to each corner joint with a drop of gel super glue.
The entire web holds fast in the wind when the main door is propped open. When the season ends, pull the magnets off and wind the yarn around an old piece of cardboard.
Bakes onto the door panel under direct sun, peels factory paint, and leaves yellow sticky patches.
Snaps on instantly, repositions without tools, and leaves the door surface completely spotless.
4. Wrap Dinette Window Trim in Faux Fall Garland and Mini Bats
Dinette window valances are often bulky fabric boxes that dominate the living area. You can soften their lines by weaving a flexible faux eucalyptus garland along the top ledge and pinning cardstock mini bats into the leaves.
The garland tucks neatly into the narrow gap between the valance and the ceiling panel. Use sewing straight pins to hold the bats in place rather than adhesive, which protects the fabric from pulls.
| Supply | Purpose | Why It Works in an RV |
|---|---|---|
| Faux Eucalyptus | Greenery base | Bends around tight corners without shedding dry needles |
| Black Cardstock | Bat silhouettes | Stiff enough to hold wing shape, flat enough to store in a folder |
| Sewing Pins | Fasteners | Anchors directly into padded valances without leaving wall holes |
Assembly Checklist
5. Cut Felt Bat Cutouts to Mount Along the Slide-Out Trim
Paper decor can tear when a slide-out moves, but stiff craft felt bends under pressure and springs right back into shape. Black craft felt gives bat cutouts a rich matte finish that absorbs glare from bright camper LED lights.
Cut three different sizes of bats from nine-inch by twelve-inch felt sheets. Apply a single removable glue dot to the belly of each bat and press them in an upward diagonal swarm along the wooden trim of your main slide room.
The felt will not scratch your vinyl wall paneling or leave oily marks. When you need to pull the slide in for travel, the soft fabric flexes harmlessly if it brushes against the rubber wiper seals.
6. Stencil Halloween Silhouette Cutouts for Window Shades
Standard pleated camper shades let soft sunlight through during the day, making them a natural canvas for spooky silhouette scenes. You can place cutouts directly behind the shade fabric so they remain invisible until your interior lights turn on at dusk.
- Trace witch hats, crooked trees, and prowling cats onto black poster board.
- Cut along your traced lines with craft scissors, keeping the outer edges clean.
- Tape the silhouettes to the window frame glass rather than the shade fabric itself.
When nighttime falls and your camper interior lights kick on, your rig casts an eerie shadow theater across the campground.
Measure the clear glass width inside the blind tension cords to set your shape boundaries.
Trace your outline on heavyweight black poster board and trim out the center negative spaces.
Fix the silhouette to the glass using removable painter tape dots at the top corners only.
7. Construct a Mini Campfire Cauldron Using Battery Tea Lights
Outdoor table centerpieces in an RV park must endure sudden evening gusts of wind. A lightweight plastic craft cauldron weighed down with smooth campsite river pebbles makes a stable patio table accent.
- Drop four rounded river stones into the bottom of an eight-inch plastic candy kettle for ballast.
- Nest three amber flickering LED tea lights on top of the stones.
- Fill the cauldron mouth with pulled polyester spider webbing so the orange glow filters through like bubbling potion broth.
Never use real flame candles anywhere near an RV campsite table. Battery-operated tea lights eliminate fire risks and will not blow out when autumn lake breezes pick up.
Plastic kettle base weighted with river gravel.
Flickering amber LED puck lights for illumination.
Heavy cast iron pots that scratch outdoor tables.
Wax candles that blow embers toward awnings.
8. String Twine and Wooden Bead Pumpkins on Awning Arms
Awning arms are prime real estate for campsite styling, but hanging glass lanterns or loose plastic flags can create noisy banging sounds in the wind. A strand of natural wooden beads strung along jute twine stays grounded, quiet, and durable.
Paint half your round wooden beads in matte pumpkin orange and the remaining half in warm forest green. Thread them along thick jute cord, tying a small knot between every group of five beads to keep them evenly spaced.
- Slide plastic awning clips into the roller tube channel to hold the twine ends securely.
- Keep the strand taut so it does not sway against your exterior fiberglass skin.
- Untie one clip and roll the strand around your hand like an extension cord when storing it away.
| Wood Bead Garland | Plastic Foil Bunting |
|---|---|
| Stays silent during 15 mph campsite gusts | Flaps loudly against the RV sidewall at night |
| Rolls tight without creasing or tearing | Crinkles permanently and tangles easily |
9. Sew Reversible Halloween Pillow Covers for the Dinette Cushions
Buying decorative seasonal pillows is one of the fastest ways to lose precious storage space in an RV. Instead of bringing new pillows into your camper, craft envelope-style fabric slipcovers that slide right over your existing throw pillows.
Select an orange buffalo plaid fabric for the front and a moody charcoal linen for the reverse. An envelope closure on the back means you avoid sewing zippers, which can rattle against wooden dinette benches or scratch dining vinyl.
When November arrives, pull the slipcovers off, run them through the campground washing machine, and fold them down into the thickness of a folded napkin.
Never purchase decorative pillow inserts for an RV. Swap the slipcovers and use the exact same cushion inserts all twelve months of the year.
10. Make Window Cling Monsters Using Puffy Fabric Paint
Commercial gel window clings often melt in warm weather, leaving greasy colored films across acrylic camper windows. You can avoid this by making custom peel-and-stick vinyl decals using standard puffy dimensional fabric paint.
- Lay a sheet of parchment paper over a printed monster or pumpkin sketch.
- Outline and fill the drawing generously with puffy craft paint.
- Allow the paint to cure undisturbed for a full twenty-four hours until firm.
Once dry, peel the design off the parchment paper. The rubbery shape sticks to clean glass using natural surface friction without adhesives, and peels away cleanly when you move camp.
📌 Acrylic Window Safety
Always wipe the window down with plain water and a microfiber cloth before applying. Avoid rubbing alcohol or chemical glass cleaners on RV acrylic panels, as harsh solvents cause micro-crazing over time.
11. Fashion a Lightweight Burlap Wreath for the RV Screen Door
Heavy grapevine or metal wreaths bounce against RV doors and damage the screen mesh during windy days. A flat embroidery hoop wrapped in wired burlap ribbon gives you farmhouse style at a fraction of the weight.
- Pick a ten-inch wooden embroidery hoop to fit between the screen door and the solid outer entry door.
- Wrap the hoop tightly in three-inch orange burlap ribbon, hot-gluing the tail at the back.
- Wire two small faux white foam pumpkins and a sprig of dried wheat to the bottom curve.
The whole assembly weighs under five ounces. Hang it using an upside-down adhesive hook on the inside of the door frame so the hanging loop drops over the top without pinching the rubber weatherstripping.
12. Paint Mason Jar Tumblers with Gauze Mummy Wraps
Glass mason jars are an accident waiting to happen in an RV kitchen. You can achieve the same rustic aesthetic by using shatterproof clear acrylic drinking tumblers wrapped in gauze bandage.
- Clean the outside of an acrylic tumbler with mild dish soap to remove fingerprints.
- Secure self-adhesive medical gauze around the tumbler body, overlapping the layers slightly.
- Tuck two large wiggle eyes between the gauze wraps and secure them with a touch of craft glue.
These tumblers are sturdy enough to survive a slide off the dinette table. Use them as utensil caddies near the cooktop during meal prep, then drop in an LED tea light after dinner for a cozy lantern glow.
Shatterproof Supply List
13. Fold Paper Accordion Pumpkins that Flatten for Storage
Carving real pumpkins inside an RV creates a messy cleanup and attracts campground critters to your outdoor area. Paper honeycombs give you the same classic pumpkin shape while folding down completely flat for easy pack-out.
- Trace half-pumpkin profiles onto twenty sheets of orange construction paper.
- Glue the pages together along alternating center and edge lines using a glue stick.
- Fasten tiny disc magnets to the outer two cover pages so they snap open when displayed.
When setup time comes, unfold the fan and click the magnets together to form a full sphere. After Halloween, simply pull the magnets apart and tuck the flat stack inside a cookbook.
Rots quickly in small spaces, produces smelly fruit flies, and attracts raccoons to your patio setup.
Odorless, zero pest attraction, and packs away into a slim craft envelope at the end of the weekend.
14. Clip Cardstock Witch Hats onto Outdoor LED Awning Lights
Most modern RVs come equipped with a built-in outdoor LED strip along the awning tube. You can dress up that existing light fixture without stringing extra cords or blowing fuses on your camper electrical system.
Roll small half-circles of waterproof black cardstock into slim cone witch hats. Cut a small three-quarter-inch hole in a cardstock disc brim and slide the cone through to assemble each hat.
Use mini wooden spring clothespins to clip the brim of each hat along the awning valance seam directly in front of each LED diode. The hats catch the light and bounce a warm ambient glow across your patio area.
Roll four-inch cardstock half-circles into cones and secure the seams with clear craft tape.
Slide the circular brim over the tip of the cone and press the tabs down inside.
Secure the top fold to your awning fabric hem using a wooden mini clothespin.
15. Design a Chalkboard Camp Menu Sign with Spooky Camper Puns
A small framed chalkboard on your kitchen counter adds custom personality to your rig. You can write out a playful evening dinner menu featuring camp-friendly Halloween recipes like spooky chili or roasted marshmallow ghosts.
- Prime the chalkboard surface by rubbing the flat edge of a chalk stick across the entire board, then wipe it clean.
- Outline your layout using a water-based liquid chalk marker rather than standard dry dusty chalk.
- Write your favorite playful camper meal ideas, like Spider Web S’mores or Ghost Campfire Stew.
Liquid chalk markers dry to a smudge-free matte finish that will not rub off on sofa cushions during transit. When you are ready for a new design, wipe the board with a damp paper towel.
Dries completely smudge-free within two minutes.
Zero chalk dust floating into your RV air filters.
Vibrates loose and covers camper counters in white powder.
Rubs off completely when bumping against walls in transit.
16. Drape Cheesecloth Ghost Bunting Across the Front Bunkhouse Ladder
Bunkhouse ladders are often plain metal or raw wood fixtures that stick out in camper interiors. Wrapping the side rails in loose unbleached cheesecloth creates an effortless haunted ship look while keeping the ladder steps completely clear and safe to climb.
Soak the cheesecloth in a bowl of weak black tea for twenty minutes to give the cotton an aged, vintage look. Wring it out and let it air dry in the sun before tearing small decorative splits along the bottom fringe with craft scissors.
- Drape the fabric along the outer support rail only, keeping the foot steps clear for climbing safety.
- Secure the top corners to the bed rail using small velcro cord wraps rather than permanent staples.
- Cut two-inch round black felt eyes and attach them near the top knot to turn the drape into a playful floating phantom.
- ▸Keep the ladder steps bare so kids maintain positive footing when climbing down at night.
- ▸Use removable hook-and-loop straps rather than safety pins so fabric pulls free if caught.
- ▸Roll the dry cheesecloth into a tight tube between seasons to preserve the frayed texture.
Keeping It Simple on the Road
Decorating an RV for fall does not mean crowding your camper floor with fragile plastic bins or buying expensive seasonal items. Choosing lightweight fabrics, flat-pack paper crafts, and magnetic hanging points lets you make simple diy rv halloween decorations that bring festive warmth to every stop.
Save this list to your RV organization and camping boards on Pinterest for your next fall road trip or cozy campground weekend.

