
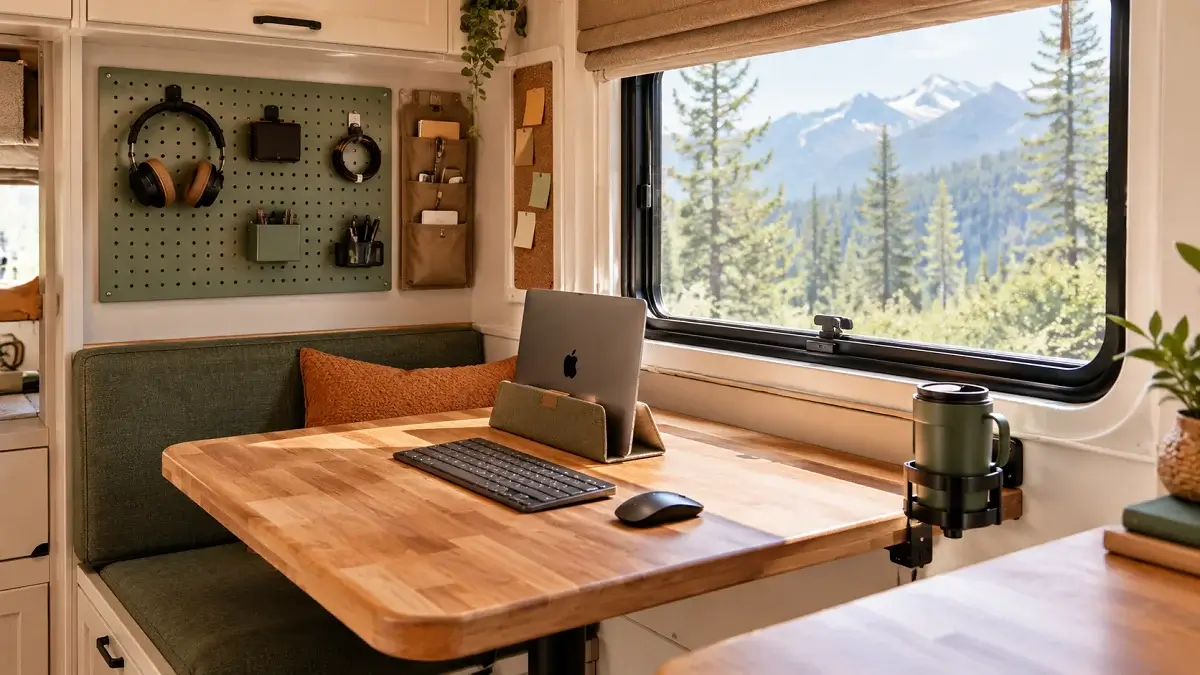
Working remotely from a camper sounds idyllic until paperwork, charging bricks, and loose cords take over the dinette table. Most stock RV workspaces are not designed for daily 9-to-5 productivity, leaving you to shuffle laptops aside every time it is time to cook dinner. Standard home office organizers rarely work either, because items slide or spill the second your rig hits an uneven highway.
The secret to a functional mobile workstation is choosing dual-purpose gear that secures tightly before travel day. With the right setup, you can keep work gear out of sight outside office hours without spending twenty minutes packing everything away every evening.
These practical rv office storage ideas show you how to reclaim your desk space, tame tangled cords, and create a rattle-free setup that stays put on moving day.
1. Mount a Shallow Drop-Down Wall Tray for Work Tablets
Vertical wall space right behind your workspace is often overlooked. A shallow wooden or powder-coated metal tray keeps your daily planner, work notebook, and tablet upright and within arm’s reach without stealing precious desktop depth.
💡 Quick Tip
Add a strip of peel-and-stick felt inside the pocket. It stops devices from vibrating against bare wood while towing and prevents scratches on screens.
Look for a mail sorter or display ledge with at least a three-inch front lip. If your RV walls use lightweight hollow paneling, skip standard drywall anchors and install your tray using heavy-duty command picture-hanging strips or toggle bolts.
- Mount it at shoulder height while seated so items do not crowd your elbow room.
- Keep depth under three inches to avoid bumping into it when sliding out of a dinette booth.
- Use a small elastic bungee cord across the top edge as a backup lock during travel days.
2. Add an Under-Desk Sliding Cable Management Trough
Loose cables and heavy power bricks create immediate visual clutter on compact RV surfaces. Hanging a wire mesh trough directly beneath your desktop gets the mess off the floor and out of foot range.
Zip-tie the surge protector directly to the wire tray frame.
Use reusable hook-and-loop wraps to bundle excess cord length.
Leaving power bricks resting loose on the camper floor.
Running thick extension cords across main walking paths.
Measure the clearance under your table before buying a tray to make sure your knees have plenty of room. A solid metal trough is great, but open-wire mesh trays allow for better heat dissipation from warm laptop chargers.
- Pre-drill pilot holes using shallow wood screws that will not punch through your desktop finish.
- Fasten a surge protector with integrated USB-C ports inside the basket.
- Plug in your primary monitor, dock, and phone chargers so only a single master power cord drops to the wall outlet.
3. Install Flush-Mount Magnetic Strips for Metal Tools and Drives
A wall-mounted magnetic rail keeps small metallic accessories off your table without requiring storage cups that tip over during travel. While popular in camper kitchens for cutlery, magnetic bars work just as well beside an office desk.
Workspace essentials that stick securely to magnetic rails
Solid-state external drives have no moving parts and are not affected by everyday utility magnets. For items made of plastic or aluminum, stick a thin adhesive metal plate to the back of the casing.
- Mount the magnetic strip horizontally right below an overhead cabinet edge.
- Keep traditional spinning mechanical hard drives away from strong magnetic bars.
- Choose rubber-coated or silicone-wrapped strips to prevent scratching your accessories.
4. Clip Undermount Felt Drawers Beneath the Work Surface
Camper tables and built-in desks rarely come with built-in drawers. Peel-and-stick slide-out drawer boxes create instant hidden compartments beneath any smooth desk slab.
Pens, earbuds, sticky pads, and cables cluttering the table corner all day.
A clean, open surface with all daily stationery tucked out of sight below.
Felt and soft-sided slide-outs are quieter on bumpy roads than hard plastic trays that can rattle while driving. They pull out smoothly and push flush with the table lip when the workday ends.
- Clean the underside of your desk thoroughly with rubbing alcohol to remove grease and sawdust.
- Apply high-strength automotive double-sided foam tape if the included adhesive feels flimsy.
- Press firmly for sixty seconds and allow the bond to cure for twenty-four hours before filling the drawer.
5. Run Heavy-Duty Adhesive Cord Raceways Along Corner Trims
Exposed cords hanging down camper walls look messy and can snag on slides, pets, or clothing. Surface-mounted cord channels conceal wires securely against the wall.
Wipe the wall trim with isopropyl alcohol and dry completely.
Cut the plastic raceway to length with sturdy kitchen shears or a hacksaw.
Peel the adhesive backing, press along the corner seam, and snap the cover over your cables.
Pick raceways that match your interior trim, or choose paintable channels to blend them with your wallpaper or paneling. Corner channels are especially helpful because they tuck neatly into seams where walls meet window frames.
- Run monitor power cords, HDMI connections, and 12V charger wires in separate channels if space permits.
- Leave two inches of slack at the bottom so cords can flex with the movement of adjustable monitor arms.
- Avoid running channels across slide-out seams where parts shift during extension.
6. Anchor a Fold-Flat Document Sorter Inside an Upper Locker
Loose tax paperwork, camper registration papers, and work contracts quickly turn into messy stacks. An accordion-style or fold-flat hanging folder organizer mounted inside a cabinet keeps papers sorted without consuming desk room.
Traditional plastic desk trays slide off counters during transit and gather dust. Placing a fabric or plastic folder frame inside an overhead cabinet keeps documents safe from light, spills, and sudden stops.
- Use tabs labeled by client, vehicle maintenance, medical records, and receipts.
- Select a file folder box with a snap-shut lid so loose pages never scatter inside the cupboard.
- Store heavier tax binders flat on the cabinet bottom to keep your camper’s center of gravity low.
7. Secure Your Laptop in an Upholstered Vertical Dock
Leaving a laptop open on the desk while plugged into an external monitor takes up more than a square foot of usable workspace. A vertical laptop dock stands your machine on its side, reducing its footprint to just a few inches.
⚠️ Watch Out
Check where your laptop exhausts heat before placing it in a vertical dock. Never block exhaust vents or keep a heavy workload running if your laptop requires the screen lid to be open for cooling.
Look for a dock with an adjustable clamping screw and silicone-lined jaws. This ensures a snug fit around your laptop chassis so it cannot tip over from vibrations or light bumps.
- Place the dock against the wall or behind the external monitor out of main arm paths.
- Fasten the dock base to the tabletop with a square of industrial hook-and-loop tape to prevent sliding.
- Leave ports facing upward or toward the wall for direct cable routing.
8. Hang Deep Canvas Wall Pockets Beside the Dinette Window
The narrow strip of wall beside a dinette or slide-out window is prime real estate for soft, lightweight organization. Hanging canvas pockets provide an easy catch-all for gear you use throughout the workday.
Unlike metal or hard plastic wall caddies, fabric pockets do not clatter when you bump into them. They collapse flat when empty, making them ideal for spaces near slide-out seals.
- Secure the top grommets with two heavy-duty screw-in hooks rated for at least five pounds.
- Put heavier accessories in lower pockets to keep the fabric hanging straight.
- Empty out heavy items into a cabinet latch bin on travel days to reduce strain on wall grommets.
9. Fasten a Slide-Out Keyboard Tray with Travel Lock Pins
Placing your keyboard and mouse on a small RV table forces you to push your screen uncomfortably close. An under-mount keyboard tray frees up desk space and improves everyday ergonomics.
| Feature | Clamp-On Tray | Screw-In Rail Tray |
|---|---|---|
| Installation | Zero drilling required | Requires pilot holes |
| Travel Stability | Can slide out on sharp turns | Locks with pin detent |
| Leg Room | Drops down 3 to 4 inches | Tucks close to tabletop |
If you choose a screw-in model, look for one that features a mechanical latch or detent pin. This stops the shelf from rolling out into the aisle when making turns on highway off-ramps.
- Measure your chair height to ensure the tray clears your lap comfortably while typing.
- Use a tray wide enough to fit both an ergonomic keyboard and a mouse on the same level.
- Line the tray bed with a non-skid desk mat so peripherals stay in place during light bumps.
10. Use Heavy-Duty Hook-and-Loop Strips for Power Hubs
Power strips, multi-port USB hubs, and monitor splitters tend to migrate across your desk whenever cords get moved. Locking them down with heavy-duty interlocking fasteners makes your workspace feel clean and permanent.
Interlocking plastic fastener strips hold five times stronger than standard fuzzy fabric tape and will not peel apart under road vibrations.
Mount your power hub to the back edge of your desk, onto the inside wall of a dinette bench, or directly to the monitor stand pillar. It keeps multiple plugs organized in one dedicated place.
- Clean all surfaces with alcohol before applying adhesive pads.
- Press the interlocking strips together until you hear an audible snap.
- Anchor the main power cable to the camper wall using an adhesive clip so the strip does not carry dangling wire weight.
11. Fit Stackable Clear Acrylic Trays Inside Narrow Overhead Cabinets
Overhead cabinets in campers are often unusually deep and lack shelves, which quickly leads to jumbled stacks of clutter. Clear acrylic storage boxes make full use of vertical space while keeping small work supplies visible.
Office sundries ideal for clear bin sorting
Choose bins with secure lids so they stack neatly without sliding around inside the cabinet. Clear plastic makes it easy to find what you need without pulling every container off the shelf.
- Measure cabinet door openings carefully, as the frame is often narrower than the internal shelf.
- Line the bottom of the cabinet shelf with ribbed, non-adhesive drawer liner to reduce sliding.
- Group related items by task so you only have to pull down one box at a time.
12. Hang a Perforated Metal Pegboard with Locking Peg Clips
Wall-mounted pegboards turn an empty wall into an adaptable storage zone. A metal board provides solid support for heavy gear and will not swell or degrade in changing humidity like fiberboard can.
Use locking plastic pegs that screw tight onto the metal board.
Add slim metal baskets with deep side walls for bulky adapters.
Using standard loose wire hooks that bounce free on rough roads.
Hanging heavy laptops or heavy book stacks directly from peg hooks.
Metal pegboards are slim and take up almost no physical room in your RV living area. You can hang utility baskets, headphones, scissor clips, and pen holders all in one central location.
- Fasten the panel into the camper wall studs or use hollow-wall anchor toggles with wide washers.
- Place a thin rubber washer between the board and wall at mounting points to silence squeaks.
- Clip loose tools onto the hooks using elastic bands for added security on travel days.
13. Build a Hinged Desktop Lid Over Hidden Bench Storage
If your RV workspace sits over a dinette bench, convert that space into hidden office storage. A hinged top turns hard-to-reach under-seat cavities into simple top-access compartments for bulky equipment.
Pulling off heavy cushions and plywood covers just to reach a stored printer.
Smooth gas-strut lid that lifts effortlessly with one hand for quick gear access.
Deep bench voids often turn into messy collection zones. Adding lightweight wood dividers separates this space into neat sections for reference books, backup tech, and oversized office gear.
- Cut the existing plywood bench lid into two pieces so you only lift the section you need.
- Install small gas assist struts so the lid stays open safely while you retrieve items.
- Drill a one-inch thumb hole or add a flush-mount pull ring so you can lift the lid without catching seat upholstery.
14. Install Spring-Loaded Tension Rods to Lock Books in Open Cubbies
Open camper cubbies are great for storage, but their contents easily tumble out on bumpy roads. A small, adjustable spring-loaded curtain tension rod acts as an effective retaining bar.
💡 Quick Tip
Slip small rubber furniture cups over both ends of the tension rod. They provide extra grip against glossy camper finishes and keep the rod firmly in place.
Tension rods are inexpensive and install in seconds without screws, glue, or wall damage. They keep tech manuals, notebooks, and supply binders upright and secure during transit.
- Position the rod about two inches above the shelf surface and an inch back from the outer face.
- Twist the rod to extend it roughly half an inch wider than the shelf width before compressing it into place.
- For cubbies holding tall, flexible paper files, install a second parallel rod higher up.
15. Add a Rotating Clamp-On Desk Caddy for Drink and Pencils
Spilling a travel mug of coffee over your laptop keyboard can bring your workday to an abrupt halt. A sturdy, clamp-on rotating cup holder keeps your mug off the table surface entirely.
These caddies clamp onto the outer edge of your desk, holding cups, pens, or small sundries. When the workday wraps, simply swivel the basket inward beneath the tabletop so nobody bumps into it walking past.
- Confirm the clamp opens wide enough to fit your specific tabletop thickness.
- Use models featuring an integrated headphone hook underneath the cup bracket.
- Unscrew the clamp in seconds if you need to clear the dinette table for dinner.
16. Stow Extra Tech and Cables in Zippered Padded Electronics Cases
Tossing loose charging cables and dongles into random drawers is a recipe for broken connectors and tangled messes. A structured, zippered travel organizer case keeps all your mobile tech components protected and ready to pack.
Sort your cables by type and roll them into compact coils using velcro wraps.
Tuck adapters, memory cards, and USB hubs into the mesh zippered compartments.
Slide the slim, closed case vertically into an overhead bin or behind your desk seat.
Look for cases built with water-resistant nylon shells and semi-rigid padding. This cushions delicate accessories from bumps and prevents heavy items from crushing your spare mouse or dongles.
- Assign one specific pocket for essential internet gear, such as SIM ejector tools and hotspot chargers.
- Label identical black charging cables with small colored bands to quickly identify voltages and ends.
- Keep a dedicated work bag ready so you can grab your mobile office for coffee shop work sessions without forgetting cords.
17. Mount an Under-Cabinet Paper Towel Bar for Rolled Tech Cables
Under-cabinet spaces are rarely used to their full potential in camper layouts. A basic wooden or metal bar mounted beneath an overhead cupboard creates a simple spooling rack for rolls of tape, headset bands, and bundled cords.
- ▸Hang noise-canceling headphones by their headband for instant, scratch-free access.
- ▸Spool rolls of packing tape, electrical tape, and hook-and-loop cable ties right where you can reach them.
- ▸Clip lightweight notes or project checklists using small wooden clothes pins.
This trick reclaims usable desk space by lifting bulky accessories into unused air space. It keeps your desktop free for your laptop, mouse, and daily paperwork.
- Choose a bar that slides open or unscrews easily so you can swap out rolls in seconds.
- Install it far back under the cabinet so it stays out of your direct line of sight when seated.
- Line the bar bracket with foam tape before screwing it in to stop metal rattles while towing.
18. Slip a Slim Rolling Cart Between the Desk and Bed Frame
Many RV bedrooms or slide-out rooms have a narrow, six- to eight-inch gap between furniture that goes unused. A ultra-slim three-tier rolling utility cart slides into these tight spaces to create accessible, tucked-away storage.
Rolling carts make it easy to roll your entire office setup into view for the workday and tuck it away behind a curtain or wardrobe before guests arrive. Look for carts with built-in caster wheel locks.
- Measure your gap width at the narrowest point, accounting for baseboards and slide-out molding.
- Put the heaviest supplies on the bottom shelf to prevent the narrow cart from tipping when pulled out.
- Fasten a flat eyelet screw to the wall and hook an elastic bungee cord across the cart to secure it on travel days.
19. Fasten Silicone Desktop Cable Grips to the Back Edge
Having a charging cable slip off the back of the desk into the tight space behind a dinette seat is an annoying daily hassle. Adhesive silicone cable clips hold individual cords right where you need them.
📌 Good To Know
Wipe the desk surface with isopropyl alcohol before sticking down silicone pads. Press the adhesive firmly for thirty seconds and wait twenty-four hours before feeding heavy cords into the clips.
These small silicone holders come with molded channels that grip standard USB, monitor, and phone cables. They let cords slide freely when you pull on them, but catch the plug ends before they tumble behind furniture.
- Position the channel block near the back corner closest to your camper wall outlet.
- Pick multi-slot blocks so your phone, laptop, and tablet cords are all lined up in one clean row.
- Use neutral colors that match your tabletop finish to keep the clips subtle and unobtrusive.
20. Use Removable Canvas Cube Bins for Bulky Printers and Scanners
Camper office hardware like compact all-in-one printers, label makers, and mobile scanners are awkward to store. Stashing them in soft canvas cube bins keeps them safe from dust and prevents hard equipment edges from scratching your cabinetry.
| Feature | Padded Fabric Cubes | Open Wire Baskets |
|---|---|---|
| Hardware Protection | Cushions delicate plastic cases | Can scuff gear during transit |
| Noise on Road | Completely silent | Can rattle against woodwork |
| Storage Weight | Ultra-lightweight | Adds extra metal weight |
Canvas storage bins slide smoothly into bottom cabinets, wardrobe floors, or under-bed storage zones. Storing gear this way keeps your hardware out of sight when not in use and keeps cabinet interiors tidy.
- Choose bins with reinforced fabric handles so you can lift heavy gear without tearing the seams.
- Add a simple cardboard base insert inside the bin to keep the bottom flat under printer weight.
- Store extra paper packs and spare ink cartridges in the base of the bin underneath the printer.
21. Attach a Low-Profile Cork Rail for Active Sticky Notes and Deadlines
Taping reminders directly to your camper wall finish can leave sticky residue or tear decorative wallpaper. A narrow, self-adhesive cork strip gives you a dedicated spot for daily sticky notes and project reminders without claiming desktop room.
Lifting active notes and daily to-do lists to eye level keeps your compact desktop clear while keeping your top priorities front and center.
A slim cork rail fits neatly between the top of your external monitor and the bottom edge of an overhead locker. It provides an organized spot for reminders without turning your camper wall into a cluttered corkboard.
- Cut the cork strip down to match the exact width of your desk for a tailored, built-in appearance.
- Use short wooden pushpins so you do not puncture the backing into thin camper paneling.
- Clear away completed notes at the end of each workweek to keep your mobile workspace fresh and uncluttered.
Working full-time from an RV does not mean you have to deal with endless clutter, tangled cords, and crowded tables. By taking advantage of vertical walls, organizing hidden bench cavities, and using secure anchors for your gear, you can build a clean, reliable workstation that fits your rig. These practical rv office storage ideas allow you to stay productive and focused Monday through Friday, then pack up for travel day in minutes without any stress.
Save this list to your RV organization or remote work board on Pinterest so you have these tips handy the next time you refresh your mobile setup.

